


MeArm Pi robot arm kit Raspberry Kickstarter promises a compelling project for robotics enthusiasts. This kit, designed around the Raspberry Pi, allows for hands-on learning and experimentation with robotics. The project explores the various components, design considerations, implementation, software control, potential applications, and even the nuances of a successful Kickstarter campaign. The project promises to be a great way to learn and build your own robot arm, utilizing a popular single-board computer.
This comprehensive guide will delve into the specifics of the MeArm Pi kit, covering its features, advantages, potential challenges, and how to build and control it effectively. From choosing the right Raspberry Pi model to implementing advanced control algorithms, this detailed analysis will equip readers with the knowledge and insight to succeed in this exciting project. The various components of the kit, like motors, sensors, and the Raspberry Pi itself, will be examined in detail.
Detailed design considerations, implementation steps, and troubleshooting guides will provide a complete understanding.
Introduction to the Raspberry Pi Robot Arm Kit
A Raspberry Pi robot arm kit is a project that combines the versatility of a Raspberry Pi microcontroller with the precision of a robotic arm. This allows for the creation of programmable robotic systems capable of performing various tasks. The project typically involves assembling a robotic arm, interfacing it with a Raspberry Pi, and writing software to control its movement and actions.
This hands-on experience is valuable for learning about robotics, programming, and electronics.The core idea behind these kits is to provide a cost-effective and accessible entry point into the world of robotics. The components are designed to be easily integrated and controlled, making it ideal for beginners and hobbyists alike. The learning curve is often manageable, allowing users to progress from basic movement to more complex functionalities with time and practice.
Components and Their Functions
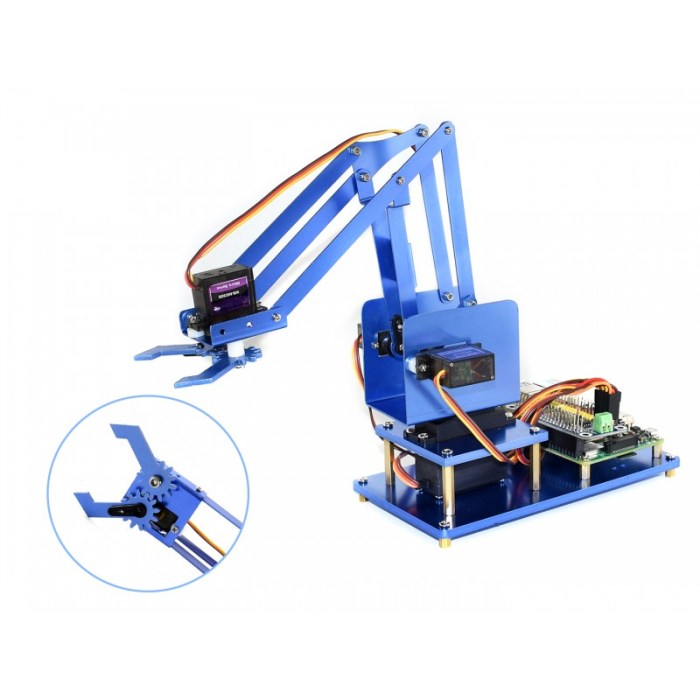
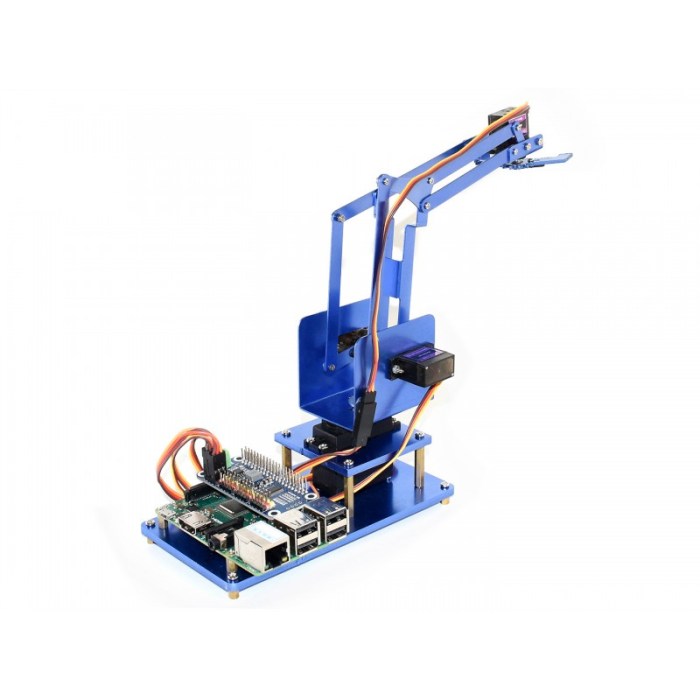
A typical kit includes a robotic arm structure, servo motors (often multiple), a Raspberry Pi board (the brain of the system), a power supply, a microcontroller (possibly separate from the Pi), connecting cables, and necessary mounting hardware. The servo motors are responsible for precise movement of the arm’s joints. The Raspberry Pi handles the programming and communication between the motors and the system.
The microcontroller, if present, may handle low-level motor control, freeing up the Pi for higher-level tasks. The power supply provides the necessary voltage and current to power all components.
Design Considerations
Several factors influence the design of a Raspberry Pi robot arm kit. A crucial aspect is the arm’s structural design. The material selection and the arrangement of joints directly affect the arm’s payload capacity, range of motion, and stability. The selection of servo motors is critical; factors like torque, speed, and precision must be balanced against cost and size constraints.
The programming interface plays a vital role. A well-designed interface simplifies the process of writing and testing control programs. This usually includes libraries and tools for easy manipulation of the arm.
Use Cases
These kits have diverse applications. They can be used for educational purposes, enabling students to learn about robotics and automation. Hobbyists may use them to create custom automated systems for tasks like picking and placing objects or manipulating materials. These kits also find use in industrial settings, though typically for more specialized applications than hobbyist use. Examples include simple pick-and-place automation for smaller parts or controlled material handling in research and development.
More complex setups might involve automation for specific tasks in production lines, like assembly or inspection.
Raspberry Pi Models and Specifications
| Model | Processor | RAM (MB) | Notes ||—|—|—|—|| Raspberry Pi 4 Model B | Broadcom BCM2711 | 1024 | High-performance option, suitable for most projects. || Raspberry Pi 400 | Broadcom BCM2711 | 1024 | Similar performance to Pi 4 Model B, with a built-in keyboard and display. || Raspberry Pi 3 Model B+ | Broadcom BCM2709 | 512 | A previous-generation model, suitable for basic projects but may struggle with more complex tasks.
|| Raspberry Pi Zero W | Broadcom BCM2709 | 512 | A smaller, lower-power option, potentially suitable for smaller, lighter-duty projects. |The table above provides a basic comparison of processing power and memory capacity across different Raspberry Pi models. The choice of model will depend on the complexity of the tasks the robot arm needs to perform. For example, the Raspberry Pi 4 model offers significant advantages for intricate applications, while the Raspberry Pi Zero W might be suitable for simpler, smaller projects.
Design and Development Considerations: Mearm Pi Robot Arm Kit Raspberry Kickstarter
This section delves into the crucial aspects of designing and developing the Raspberry Pi Robot Arm Kit, focusing on the practical choices and potential challenges. Understanding the advantages and disadvantages of using a Raspberry Pi, along with the appropriate programming languages, sensor integration, and potential project designs, is vital for a successful and robust robotic system.
Raspberry Pi Advantages and Disadvantages
The Raspberry Pi’s compact size, affordability, and accessibility make it an attractive choice for hobbyist robotics projects. Its low power consumption and readily available development tools also contribute to its popularity. However, the Raspberry Pi’s processing power may be insufficient for complex, high-speed robotic tasks. Furthermore, its limited memory can pose a challenge for large datasets or computationally intensive algorithms.
Weighing these factors is crucial when selecting the appropriate hardware for the robot arm project.
Programming Languages
Python is the most common language for controlling Raspberry Pi-based robot arms. Its extensive libraries for robotics tasks and ease of use make it ideal for beginners. Other options include C++, which offers more control over hardware but often requires more complex coding. Choosing the right language depends on the complexity of the project and the programmer’s familiarity with different programming paradigms.
Sensor Integration Challenges and Solutions
Interfacing sensors with the Raspberry Pi requires careful consideration of the signal processing and data handling capabilities of the Pi. The robot arm may need sensors for tasks such as position tracking, obstacle detection, and object recognition. Potential challenges include dealing with different communication protocols and managing the volume of sensor data. Utilizing efficient data filtering techniques and appropriate libraries can help mitigate these issues.
For instance, utilizing libraries like `RPi.GPIO` for controlling digital signals or libraries for interfacing with I2C or SPI sensors, along with proper error handling and debugging procedures, are critical to success.
Sensor Types and Uses
Various sensor types can enhance the robot arm’s capabilities. For instance, ultrasonic sensors can detect obstacles, while infrared sensors can detect proximity. Position sensors, such as potentiometers or encoders, are essential for precise arm movement control. Cameras, such as webcams, can enable object recognition and image processing, allowing the robot arm to interact with the environment more intelligently.
Each sensor type offers specific functionalities and has advantages and disadvantages based on the particular task.
Potential Project Design
| Component | Function | Specifications |
|---|---|---|
| Raspberry Pi 4 Model B | Central Processing Unit | 1.5 GHz processor, 4GB RAM |
| Servo Motors (4) | Arm Movement | High torque, precise angle control, suitable for the project’s needs |
| Ultrasonic Sensor (2) | Obstacle Detection | High accuracy, wide detection range |
| IR Proximity Sensor (1) | Object Recognition | Suitable for detecting objects within close range |
| Encoder (1) | Arm Position Feedback | Precise measurements for controlling arm position |
| Power Supply | Provides power to the system | Stable voltage output, sufficient amperage |
| Enclosure | Protects internal components | Durable, weatherproof, and suitable for the intended environment |
This table Artikels a potential design for a robot arm project, highlighting the key components and their roles. The specific specifications for each component can be adjusted based on the project’s requirements and available resources.
Project Implementation and Setup
Bringing your Raspberry Pi robot arm kit to life involves a series of well-defined steps. This meticulous process ensures a smooth transition from the initial assembly to the advanced control stage. A structured approach to each step will minimize potential pitfalls and maximize your understanding of the system. Each component plays a crucial role in the final functionality, and understanding these steps is paramount for successful operation.
Assembling the Robot Arm
The physical assembly of the robot arm kit is a crucial initial step. Following the provided instructions is essential to avoid any potential damage to the components. Carefully align the joints, ensuring secure connections. Pay close attention to the torque settings and the direction of each motor. Ensure all screws are tightened properly.
A well-assembled arm will be fundamental for smooth and reliable operation.
- Begin by carefully reviewing the assembly manual. Understanding the correct order and procedures is key to successful assembly.
- Use the provided tools and parts to connect the arm segments. Ensure all components are firmly in place.
- Pay close attention to the motor connections and their orientation.
Misalignment can cause improper operation.
- Thoroughly check for any loose screws or connections after each step.
- Take your time during assembly to avoid errors.
Configuring the Raspberry Pi, Mearm pi robot arm kit raspberry kickstarter
Proper configuration of the Raspberry Pi is critical for establishing a stable connection between the microcontroller and the robot arm.Initial setup includes installing the operating system, which is crucial for running the necessary software.
- Connect the Raspberry Pi to the power supply and monitor.
- Connect the necessary peripherals, such as the keyboard and mouse, for initial configuration.
- Follow the on-screen instructions during the initial setup process.
- Set a password for user access.
- Establish a stable network connection for future software updates and communication.
Installing Software and Libraries
Installing the necessary software and libraries is a vital step for controlling the robot arm. This process involves downloading and configuring specific packages.
- Install a suitable operating system on the Raspberry Pi, such as Raspbian.
- Update the operating system to ensure compatibility with the required libraries.
- Use a package manager, such as apt-get, to install essential software.
- Install the necessary Python libraries, such as PyRobot or similar libraries for controlling the motors and sensors.
- Download and install the drivers for the specific motors and sensors used in the robot arm kit.
Potential Issues and Solutions
Troubleshooting is an integral part of the setup process. Anticipating and addressing potential issues is crucial for efficient problem-solving.
- Problem: The robot arm does not respond to commands.
- Solution: Verify the connections between the Raspberry Pi and the robot arm components. Check for loose wires or incorrect wiring.
- Problem: The Raspberry Pi will not boot.
- Solution: Ensure the power supply is properly connected and functioning.
Verify that the Raspberry Pi is correctly plugged in.
- Problem: Errors during software installation.
- Solution: Check the internet connection. Ensure the required packages are available. Consult the documentation for specific error messages.
Software Libraries for Robotics Control
The choice of software libraries directly impacts the ease and efficiency of controlling the robot arm.
I’ve been really digging the MeArm Pi robot arm kit raspberry Kickstarter project lately. It’s fascinating how these kinds of DIY robotics kits are empowering people to learn and build. However, it’s also worth considering the broader context, like the recent concerns raised by Amnesty International regarding Google’s cloud datacenters in Saudi Arabia, which highlights potential ethical implications in the tech industry.
Ultimately, these kinds of ethical considerations will likely shape the future of these innovative robot arm kits, prompting us to think critically about the impact of technology beyond the initial project’s appeal.
| Library | Description | Pros | Cons |
|---|---|---|---|
| PyRobot | A Python library specifically designed for robotics control. | Easy to use, extensive documentation. | May not support all types of robot arm hardware. |
| ROS (Robot Operating System) | A widely used framework for robot software development. | Robust, large community support. | Steeper learning curve, more complex to set up. |
| Arduino libraries | Used for interacting with Arduino-based controllers. | Wide hardware compatibility. | Might require more coding if not using a higher-level library. |
Software Control and Programming
Controlling a robot arm involves translating human commands into precise movements. This process is handled by software, which acts as the intermediary between the user and the physical robot. Efficient and reliable software is crucial for accurate and repeatable actions, from simple pick-and-place operations to complex tasks.The software orchestrates the communication between the Raspberry Pi, the motor drivers, and the actuators.
This allows for seamless execution of the programmed movements. Understanding the programming paradigm used for the robot arm is essential to ensure smooth functionality and adaptability to diverse tasks.
Methods of Controlling Robot Arm Movements
Different methods can be employed to control the robot arm’s movements, each with its own advantages and disadvantages. These methods range from simple, direct control to more sophisticated, automated approaches. Direct control often involves manual input, while automated methods utilize algorithms to adjust and optimize movements. The choice of control method depends heavily on the complexity of the tasks and the desired level of automation.
Programming Techniques for Controlling Actions
Python is a popular choice for programming robot arms due to its readability and extensive libraries. Programming techniques involve defining the desired movements, calculating the required joint angles, and transmitting those commands to the motors. Libraries like `RPi.GPIO` and specialized robot arm libraries handle the interaction with the hardware. These libraries abstract the low-level details, allowing the programmer to focus on the high-level logic of the movements.
Code Examples for Basic Movements
Here are some examples of Python code for basic movements. These illustrate how to instruct the robot arm to move to specific positions and perform actions.“`pythonimport time# Assume necessary libraries are imported and initializeddef move_to_position(x, y, z): # Calculate joint angles based on desired (x, y, z) position # … (implementation for calculating joint angles) …
joint_angles = calculate_angles(x, y, z) # Send commands to the motors to achieve the calculated angles # … (implementation for motor control) … time.sleep(0.5) # Delay for smooth movement# Example usage:move_to_position(10, 20, 30) # Move to position (10, 20, 30)“`These snippets provide a simplified illustration; real-world implementations will require more complex calculations and error handling.
Advanced Control Algorithms
PID (Proportional-Integral-Derivative) control is a powerful technique for regulating the robot arm’s movements. It’s particularly useful for maintaining precise positions and speeds, especially in dynamic environments. PID controllers calculate adjustments to the motor signals based on the error between the desired and actual position. This allows the system to adapt to disturbances and maintain stability.
Steps for a Simple Robotic Arm Movement Program
| Step | Description ||—|—|| 1 | Initialize the robot arm and establish communication. || 2 | Define the target position (x, y, z coordinates) or joint angles. || 3 | Calculate the necessary joint angles for the target position. || 4 | Send the calculated joint angle commands to the motors. || 5 | Monitor the arm’s position and adjust as needed using feedback mechanisms (e.g., PID control).
|| 6 | Implement safety mechanisms to prevent collisions or exceeding limits. |
I’ve been digging into the mearm pi robot arm kit raspberry kickstarter lately, fascinated by its potential. While exploring the intricate design, I stumbled upon an interesting parallel with the Galaxy Note 10 teardown, revealing how phones use vapor chamber cooling systems galaxy note 10 teardown shows phones vapor chamber cooling system. This sparked an idea about potential thermal management solutions for the robot arm kit, which could significantly enhance its performance.
It’s amazing how different fields can inspire innovative solutions within the mearm pi robot arm kit raspberry kickstarter project!
Potential Applications and Extensions
This Raspberry Pi robot arm kit offers a fantastic platform for experimentation and learning. Beyond the basic functionalities, the possibilities for expansion and adaptation are vast. The modular design allows for the integration of various sensors and actuators, opening up a world of applications in diverse fields. Let’s explore some of these exciting avenues.
Diverse Applications
The robot arm kit is not limited to a single application. Its versatility allows it to be adapted to various tasks. For instance, it can be used in automated assembly lines, pick-and-place operations in manufacturing, or even in laboratory settings for sample handling. Its adaptability and ease of programming make it a valuable tool for diverse projects.
Potential Modifications and Extensions
The basic design of the robot arm kit can be significantly modified to suit specific needs. For example, different grippers can be attached to handle various objects with varying shapes and sizes. Adding a camera system can enable the arm to visually identify and manipulate objects, opening up opportunities for more complex tasks. Customizing the base structure could accommodate specific working environments or add additional degrees of freedom for increased dexterity.
Integrating Additional Sensors and Actuators
Integrating additional sensors and actuators significantly enhances the robot arm’s capabilities. A proximity sensor can detect the presence of an object, enabling the arm to avoid collisions or precisely position itself. A force sensor can measure the applied force during manipulation, ensuring delicate handling of fragile items. Adding an ultrasonic sensor allows the arm to determine distances and navigate its surroundings with more precision.
The integration of these elements transforms the arm from a basic manipulator into a more sophisticated and adaptable system.
User Input Integration
Providing user input for the robot arm’s actions is crucial for usability and control. A graphical user interface (GUI) can be developed to allow users to specify the arm’s movements, targets, and actions. The GUI can be integrated with the existing software control system, allowing the user to visually guide the arm through desired movements using a mouse or touch screen.
The user interface can also display relevant information, such as sensor readings or error messages, improving user interaction.
Application Areas and Required Functionalities
This table Artikels potential application areas and the specific functionalities needed for each:
| Application Area | Required Functionalities |
|---|---|
| Automated Assembly | Precise positioning, gripper control, object recognition (optional), high speed movement. |
| Pick-and-Place Operations | Object recognition (optional), accurate picking, precise placement, high repeatability. |
| Laboratory Sample Handling | Gentle manipulation, object recognition, precise positioning, environmental sensors (temperature, humidity). |
| Industrial Inspection | Camera integration, object recognition, measurement tools, data logging. |
| 3D Printing Support | High precision positioning, material handling, automated printing procedures, communication with 3D printer. |
Community and Resources
Connecting with others and leveraging existing resources is crucial for successfully building and troubleshooting your Raspberry Pi robot arm project. A strong online community provides support, inspiration, and readily available solutions to common challenges. This section Artikels valuable online resources and a strategy for navigating potential problems.
Online Communities and Forums
Engaging with online communities dedicated to Raspberry Pi robotics is invaluable. These platforms foster collaboration, knowledge sharing, and problem-solving. Popular forums and groups provide a space for asking questions, sharing code, and receiving feedback on your projects. Active participation in these communities allows you to learn from others’ experiences and contribute to the collective knowledge base. Example communities include the official Raspberry Pi forum, dedicated robotics forums, and online groups on social media platforms.
Tutorials and Guides
Numerous tutorials and guides are available online to assist you in building and programming your Raspberry Pi robot arm. These resources provide step-by-step instructions, detailed explanations, and practical examples. Searching for specific topics like “Raspberry Pi robot arm control with Python” or “Raspberry Pi servo motor control” will yield numerous relevant tutorials. This allows you to learn best practices, understand different approaches, and gain inspiration for your own project.
Online Courses and Workshops
Online courses and workshops offer structured learning opportunities focused on Raspberry Pi robotics. These courses often provide comprehensive training, covering hardware setup, software programming, and project development. Platforms like Udemy, Coursera, and YouTube offer a wide range of courses catering to different skill levels. Such courses can accelerate your learning process and provide a deeper understanding of the underlying concepts.
Specific examples include courses covering robotics fundamentals, Python programming for robotics, and using libraries for motor control.
I’ve been eyeing the mearm pi robot arm kit raspberry kickstarter, fascinated by its potential for DIY projects. It’s definitely a cool bit of tech, but honestly, sometimes I just want to kick back and relax while one of roborocks discounted robovacs cleans for you. This is a much more immediate gratification solution for my cleaning needs, but I’m still planning on diving into the mearm pi robot arm kit raspberry kickstarter for more intricate, hands-on projects later on.
Troubleshooting Common Problems
A structured approach to troubleshooting is essential. Begin by identifying the specific problem. Thoroughly document the steps taken, the observed behavior, and any error messages. Check for common issues like incorrect wiring, faulty components, or software errors. Detailed documentation and a methodical approach can greatly expedite the problem-solving process.
If possible, try isolating the problem to specific components or sections of the code. Using debugging tools within your development environment is also helpful in tracing errors.
Helpful Online Resources for Raspberry Pi Robotics
This table summarizes various online resources for Raspberry Pi robotics, categorized by type.
| Category | Resource | Description |
|---|---|---|
| Forums | Raspberry Pi Forum | A large community for discussing Raspberry Pi-related projects. |
| Tutorials | Instructables | A platform with detailed tutorials on various Raspberry Pi projects, including robotics. |
| Online Courses | Udemy | Provides a wide variety of online courses, including robotics courses for various skill levels. |
| Libraries/Packages | Adafruit Motor Shield Library | Provides libraries for controlling motors with the Raspberry Pi. |
| Software | Python Programming Language | A versatile programming language widely used for robotics projects. |
Kickstarter Campaign Analysis
Successfully launching a Kickstarter campaign for a Raspberry Pi robot arm kit hinges on a blend of technical prowess and savvy marketing. Understanding the typical ingredients of successful campaigns for similar projects is crucial for maximizing your chances of reaching funding goals. Analyzing the factors that propelled other successful campaigns can provide valuable insights into strategies and best practices.
Common Elements of Successful Kickstarter Campaigns for Robot Arm Kits
Successful Kickstarter campaigns for robot arm kits often share key characteristics. These projects typically showcase intricate design details, highlighting the technical aspects of the arm’s construction and functionality. Thorough documentation of the mechanical components, like the motors, gears, and joints, is essential. Detailed 3D models or CAD drawings of the robot arm are often included to demonstrate the complexity and precision of the design.
Furthermore, projects frequently emphasize the educational value and potential applications of the kit, appealing to both hobbyists and educators.
Importance of Visual Content
Visuals play a critical role in captivating potential backers. High-quality images and videos are essential to convey the project’s appeal. A compelling video showcasing the robot arm in action, demonstrating its range of motion and capabilities, is extremely impactful. Videos should ideally highlight the project’s unique selling points, such as its innovative design, ease of assembly, or integration with the Raspberry Pi platform.
Clear, detailed images of the kit’s components, assembly instructions, and any included accessories are crucial to inspire confidence in the project’s practicality and completeness.
Importance of a Compelling Project Narrative
A compelling narrative is essential for connecting with potential backers on an emotional level. A good story often emphasizes the project’s creator’s passion, the problem it solves, and the potential impact on the community. This narrative should be concise, engaging, and authentic. It should clearly communicate the project’s benefits, not just its features. For instance, a narrative might highlight how the robot arm kit can be used in educational settings or even to aid in accessibility for people with disabilities.
The narrative needs to resonate with the target audience and inspire them to support the project.
Strategies for Effective Marketing on Kickstarter
Effective marketing strategies on Kickstarter are crucial for increasing visibility and generating interest. Creating engaging social media campaigns across platforms like Twitter, Instagram, and Facebook can significantly expand the reach of the campaign. Collaboration with relevant influencers or bloggers in the robotics and Raspberry Pi communities can be a powerful tool to reach a wider audience. Building a dedicated email list allows for direct communication with potential backers, providing updates and fostering a sense of community.
Running targeted advertising campaigns, utilizing relevant s and hashtags, can also help attract the right audience.
Table Contrasting Successful and Unsuccessful Kickstarter Campaigns for Robot Arm Kits
| Element | Successful Campaigns | Unsuccessful Campaigns |
|---|---|---|
| Visual Content | High-quality images and videos showcasing the robot arm’s functionality and design details. | Low-quality or limited images and videos, lacking demonstration of the arm’s capabilities. |
| Project Narrative | Clear, engaging, and authentic story highlighting the project’s benefits and impact. | Vague or uninspired project narrative, failing to connect with the target audience. |
| Community Engagement | Active interaction with backers through comments, updates, and social media engagement. | Limited or no interaction with potential backers, creating a sense of distance. |
| Marketing Strategy | Comprehensive marketing strategy utilizing social media, email marketing, and influencer collaborations. | Lack of a focused marketing strategy, leading to low visibility and engagement. |
| Technical Documentation | Thorough and detailed technical documentation, including assembly instructions, CAD drawings, and component specifications. | Insufficient or unclear technical documentation, creating uncertainty about the project’s practicality. |
Closure
The MeArm Pi robot arm kit Raspberry Kickstarter presents a captivating opportunity to explore the fascinating world of robotics. This guide, encompassing the project’s design, implementation, software control, and even Kickstarter strategies, offers a robust understanding of the entire process. Whether you’re a seasoned robotics enthusiast or a newcomer to the field, this guide will provide a valuable framework to construct, control, and even potentially expand upon your robot arm creation.
It provides a practical and engaging approach to learn robotics.