


How to take macro photos with iphone? This guide dives deep into the fascinating world of close-up photography using your iPhone. From understanding the fundamentals of macro photography to mastering iPhone settings and lighting techniques, we’ll explore everything you need to capture stunning details in the world around you.
We’ll cover essential iPhone settings for sharp focus, discuss effective lighting strategies for optimal illumination, and explore composition techniques to bring your macro images to life. Plus, we’ll uncover helpful accessories and post-processing tips to elevate your macro photography to the next level. Get ready to unlock the hidden beauty in the everyday!
Introduction to Macro Photography with iPhones
Macro photography is the art of capturing extremely close-up images of small subjects, emphasizing details that are normally unseen to the naked eye. It’s a captivating genre that allows photographers to explore the intricate beauty of the natural world, from the tiny veins of a leaf to the intricate patterns on an insect’s wing. This approach often requires specialized equipment and techniques to achieve sharp focus and detailed images.While iPhones don’t possess the same macro capabilities as dedicated cameras, they offer surprising results for this style of photography.
Snapping amazing macro photos with your iPhone is super fun, but sometimes you just need a break from the pixel-perfect world of tiny details. If you’re looking for something a little bigger, you might want to check out how to watch the Samsung Galaxy S24 event stream here. Then, once you’ve caught all the latest tech news, you can head back to your macro photography adventures! Experimenting with different angles and lighting can seriously elevate your iPhone macro game.
Their built-in cameras, combined with clever techniques and apps, can produce compelling macro images. Understanding the limitations and leveraging the strengths of your iPhone is key to mastering this genre. This exploration will guide you through the basics, empowering you to capture the world in exquisite detail.
Defining Macro Photography
Macro photography is characterized by a magnification ratio of 1:1 or greater. This means the image projected onto the sensor is the same size as the subject itself. Lower magnification ratios, such as 1:2, are also considered macro. This approach allows for a high level of detail, capturing the fine textures and intricate structures of subjects.
iPhone Macro Capabilities and Limitations
iPhone cameras are excellent for everyday photography, but their macro capabilities are limited compared to specialized cameras. The fixed focal length and relatively short minimum focusing distance are inherent constraints. However, iPhones excel in terms of accessibility and ease of use, making them a powerful tool for beginners. Creative techniques can often compensate for the limitations, allowing for compelling macro images.
Depth of Field and Focus in Macro
Depth of field is crucial in macro photography. It refers to the distance between the nearest and farthest objects that appear acceptably sharp in the image. In macro, depth of field is typically shallow, meaning only a small area in focus. Focusing precisely on the intended subject is essential. Using manual focus or focusing assist features in the iPhone camera app is often necessary to achieve the desired results.
Understanding the principles of depth of field is crucial to controlling the sharpness of your image.
Getting those close-up shots with your iPhone can be surprisingly easy. Focus on a tiny subject, like a flower petal or a drop of dew, and get really close. Using the macro mode on your phone, you’ll be amazed at the detail you can capture. Recently, though, a bigger picture has emerged in the tech world, with Yelp selling off its Eat24 service to Grubhub, yelp sells eat24 to grubhub.
It’s a significant move, but back to photography, try using a tripod for stable shots and adjust your lighting for optimal results. Experiment with different angles and you’ll soon be snapping incredible macro photos with your iPhone.
Lighting in Macro Photography
Lighting plays a vital role in macro photography, directly impacting the quality and overall appearance of the image. Sufficient and well-directed light helps illuminate fine details, minimizing shadows and maximizing clarity. Natural light, such as sunlight filtered through leaves or diffused by clouds, often provides excellent results. Alternatively, artificial light sources, like LED lamps, can provide consistent illumination.
Experimentation with different lighting setups will help you achieve the desired effect.
Techniques for Macro Photography with iPhones
| Technique | Description | iPhone Feature | Example Image Description |
|---|---|---|---|
| Close-up Shots | Positioning the camera as close as possible to the subject, maximizing detail. | iPhone camera’s automatic focus | A close-up of a flower petal, highlighting its intricate veins. |
| Using a Macro Lens Attachment | Employing a third-party macro lens or accessory to increase magnification and bring the subject closer to the camera. | Third-party lens attachments | A detailed shot of an insect’s compound eye, revealing its complex structure. |
| Employing a Tripod | Using a tripod to ensure stability, enabling sharper images, especially in low-light conditions. | iPhone camera’s stability features | A sharp image of a small, delicate object, such as a miniature sculpture. |
| Utilizing Lighting Techniques | Adjusting light sources to highlight specific features of the subject. | Editing tools within the iPhone camera app | A macro shot of a dewdrop clinging to a spiderweb, showcasing its reflective quality. |
Essential iPhone Settings for Macro: How To Take Macro Photos With Iphone
Mastering the focus, zoom, and exposure settings on your iPhone is crucial for capturing sharp, detailed macro images. Understanding these controls allows you to fine-tune your shots to achieve optimal results in close-up photography. Knowing how to adjust these settings will significantly improve your iPhone macro images, making them stand out from the typical snapshots.Effective macro photography on iPhones relies heavily on precise control over focus, zoom, and light.
These settings directly influence the sharpness, detail, and overall quality of your close-up images. Understanding how to manipulate these controls empowers you to create compelling macro photos that showcase the intricate details of your subjects.
Focus Settings
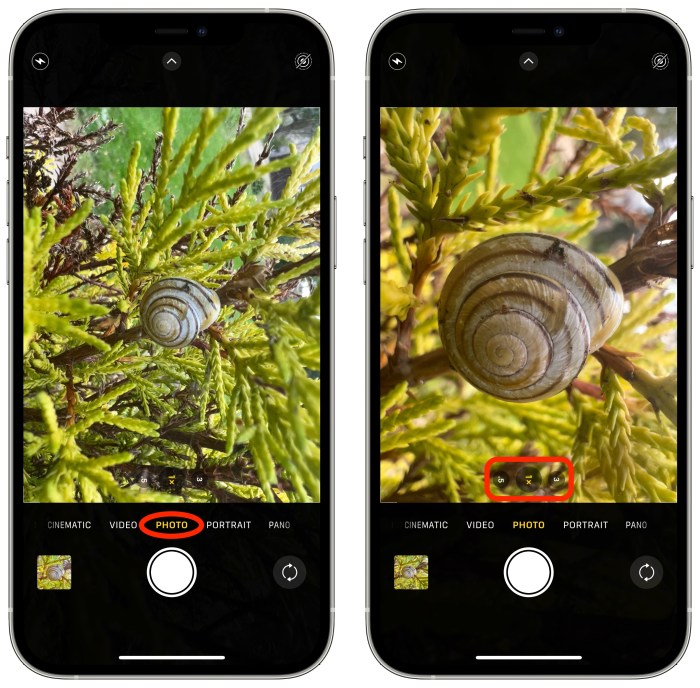
Accurate focus is paramount in macro photography. iPhone’s autofocus system, while generally effective, can struggle with extremely close subjects. The ability to manually adjust focus allows for precise control over the area of sharpest detail. To fine-tune your focus, use the screen’s on-screen controls. Tap the screen to set the focus point.
When focusing on a small subject, touch and hold on the area you want to be sharp. This ensures the area you want in focus is correctly emphasized, producing a clear image.
Digital Zoom
Digital zoom on iPhones crops the image, reducing resolution and detail. Avoid using digital zoom for macro photography. The resolution loss is noticeable, particularly in close-up images. Maintaining the original resolution is vital for capturing fine details. Using the digital zoom reduces the overall quality of the image, making it difficult to capture intricate details.
It’s always best to get as close as possible to your subject using the camera’s physical zoom range.
ISO and Exposure Compensation
In macro photography, lighting conditions can significantly impact image quality. Adjusting ISO and exposure compensation allows you to fine-tune the image’s brightness and contrast. Higher ISO settings can introduce noise, especially in low-light conditions. It is generally best to keep ISO as low as possible for clear images. The optimal ISO depends on the lighting conditions; you should keep it low to avoid introducing noise.
Exposure compensation allows you to adjust the overall brightness of the image. This is particularly helpful in bright conditions or when shooting in the shade. Proper exposure compensation ensures that the details are well captured and not overexposed or underexposed.
Settings Table
| Setting | Description | Recommended Value | Impact on Macro Images |
|---|---|---|---|
| Focus | Area of sharpest detail | Manual focus (tap and hold) | Sharpest image possible |
| Zoom | Magnification of image | Optical zoom only | Preserves image quality; avoid digital zoom |
| ISO | Light sensitivity | Lowest possible setting | Reduces noise, preserves detail |
| Exposure Compensation | Adjusts image brightness | Neutral or slightly adjusted as needed | Ensures proper brightness and contrast |
Techniques for Achieving Sharp Focus
Mastering macro photography with your iPhone hinges significantly on achieving precise focus. This crucial aspect often separates amateur shots from professional-quality images. The small depth of field in macro photography makes pinpoint accuracy paramount. This section delves into techniques that enhance focus, from utilizing manual focus to minimizing camera shake.Achieving sharp focus in macro photography is challenging because of the extreme magnification and shallow depth of field.
This necessitates careful consideration of various factors. Manual focus, for example, allows for a level of precision that automatic focus often can’t match. Additionally, understanding and minimizing camera shake is essential for crystal-clear images.
Manual Focus: Precision in Depth
Manual focus provides the control necessary for achieving the sharpest possible focus in macro situations. iPhone’s macro mode often struggles with the minute adjustments needed for extreme close-ups. Switching to manual focus allows you to fine-tune the focus point with exceptional precision. This precision is particularly vital when dealing with extremely small subjects. The advantages are clear: precise control over the focus plane, which is crucial in macro photography.
This often results in images with incredibly sharp details.
Minimizing Camera Shake: Stable Shots
Camera shake is a common enemy of sharp macro photos. The smaller the subject, the more susceptible your images are to blurring. This is due to the increased magnification requiring more stability. Techniques to mitigate camera shake are crucial in macro photography. Using a stable surface for your iPhone or a tripod is the most effective way to avoid blurring.
Alternatively, you can use a beanbag or other sturdy surface.
Utilizing Live View for Enhanced Focus
The iPhone’s live view feature allows for real-time focus adjustment, a powerful tool in macro photography. Magnifying the subject in live view offers a magnified preview of the subject, aiding in precise focus. This real-time feedback enables adjustments before taking the shot. This feature is especially helpful for critical details and ensuring sharpness. The live view can be used to pinpoint the exact moment the subject is in focus.
Stability Tips for Macro Photography
Maintaining stability is crucial for sharp macro images. These tips enhance stability and reduce camera shake:
- Use a Stable Surface: Resting your iPhone on a sturdy surface like a table or tripod is a fundamental technique. This eliminates hand-held camera shake. Even a small amount of movement can cause blur.
- Employ a Tripod: For the ultimate stability, a tripod is indispensable, especially for extended exposures. This is a significant improvement over holding the phone. This technique is particularly useful for situations with low light.
- Utilize a Beanbag or Other Support: These provide a stable surface to rest the phone, similar to a tripod. This can be a great alternative to a tripod when a tripod isn’t readily available.
- Find a Steady Surface: Look for a surface free from vibrations and choose a location with minimal distractions.
- Support with Your Hands: If a tripod or beanbag isn’t available, use both hands to support the iPhone, keeping your elbows close to your body. This minimizes any movement.
Lighting Strategies for Macro Photography
Mastering lighting is crucial for achieving stunning macro photos with your iPhone. Proper lighting can dramatically enhance detail, contrast, and overall visual appeal. This section will explore various lighting conditions and techniques, from utilizing natural light to employing external sources. Understanding these strategies will empower you to capture captivating macro images.
Natural Light Strategies
Natural light is often the most accessible and beautiful option for macro photography. Sunlight, diffused through clouds or filtered by trees, creates soft, even illumination that minimizes harsh shadows. Positioning your subject for optimal illumination is key. Consider the direction and intensity of the light. Early morning or late afternoon light often produces warm, golden tones ideal for macro subjects.
Placing your subject near a window or in a shaded area can soften the light, preventing harsh highlights and deep shadows.
External Lighting Sources
External lighting sources like flashlights or LED lights provide more control over the light. These sources can be used to fill in shadows, add highlights, or create specific effects. Using a flashlight directly on your subject can create harsh shadows. A better approach is to use a diffused light source or bounce the light off a nearby surface.
LED lights, particularly those with adjustable brightness and color temperature, offer more flexibility in shaping the light.
Comparison of Lighting Setups
Different lighting setups offer distinct advantages and disadvantages. Natural light, while often beautiful, can be unpredictable. External light sources, however, allow for greater control and consistency, but may require more setup and experimentation.
Lighting Condition Comparison Table
| Lighting Condition | Description | Advantages | Disadvantages |
|---|---|---|---|
| Natural Light (Sunny) | Direct sunlight. | Beautiful, natural tones, often readily available. | Harsh shadows, highlights, and unpredictable light changes. |
| Natural Light (Overcast) | Soft, diffused light. | Even illumination, minimizes harsh shadows and highlights. | Can appear less vibrant than direct sunlight. |
| Flashlight (Direct) | Direct light from a flashlight. | Provides instant illumination. | Creates harsh shadows and may wash out details. |
| LED Light (Diffused) | LED light source with a diffuser. | Controllable intensity and color temperature, soft light. | Requires setup, may not be as portable as flashlights. |
Composition and Framing Techniques
Macro photography, with its focus on minute details, demands meticulous composition to bring out the subject’s beauty and intricacies. Effective framing and composition techniques are crucial for transforming simple macro shots into compelling visual narratives. A well-composed macro image captivates the viewer, drawing attention to the subject and evoking a sense of wonder at the unseen world.
Leading Lines
Leading lines are powerful compositional tools that guide the viewer’s eye towards the subject of a macro photograph. These lines can be natural elements, such as veins in a leaf or the strands of a spiderweb, or man-made elements, like the grooves in a textured surface. By strategically placing these lines within the frame, photographers can draw the viewer’s attention to the focal point.
The lines should not overwhelm the subject but rather subtly direct the eye. For example, a spiderweb with a dewdrop at its center, where the web lines lead directly to the drop, creates a dynamic composition.
Rule of Thirds
The rule of thirds is a fundamental compositional guideline applicable to all genres of photography, including macro. This technique involves dividing the image into a grid of nine equal sections using two horizontal and two vertical lines. Placing the subject along these lines or at their intersections often creates a more visually appealing and balanced composition. A flower’s delicate petals, positioned at the intersection of these lines, will appear more prominent and engaging than if placed centrally.
Symmetry
Symmetry in macro photography can create a sense of harmony and balance. Whether it’s the perfect mirroring of a flower’s petals or the symmetrical arrangement of insect wings, symmetry can add a sense of elegance and order to a macro image. A macro shot of a bee’s eye, showcasing its symmetrical facets, is a prime example of this technique.
The symmetry emphasizes the intricate details of the insect’s structure.
Background Control and Subject Isolation
Background control is paramount in macro photography for isolating the subject and preventing distractions. A cluttered or distracting background can detract from the subject’s beauty. Techniques such as shallow depth of field, achieved through a wide aperture setting, effectively blur the background, allowing the subject to stand out. Using a plain background or strategically placing the subject away from distracting elements can enhance the image’s impact.
For instance, a macro shot of a single raindrop on a leaf, with a softly blurred background of foliage, ensures the raindrop is the central focus.
Cropping and Post-Processing
Cropping is a crucial post-processing technique in macro photography. It allows photographers to refine the composition, remove unwanted elements, and focus attention on the most compelling aspects of the subject. Cropping can be used to eliminate distractions, such as stray elements in the background or imperfections in the subject. Post-processing tools, such as editing software, can be used to fine-tune the image’s sharpness, color balance, and contrast, enhancing the overall aesthetic.
Cropping and editing can elevate the quality of macro images, bringing out the finest details and enhancing the visual impact.
Creative Composition Ideas
- Focus on Texture: Highlight the unique textures of natural elements, like the surface of a leaf or the intricate patterns on an insect’s exoskeleton. Use lighting to emphasize these textures.
- Highlighting Details: Zoom in on specific details of a subject, such as the intricate veins in a leaf or the delicate hairs on an insect’s body. This technique reveals the hidden beauty in seemingly ordinary things.
- Using Negative Space: Employ negative space effectively to create a sense of spaciousness and tranquility. Surrounding the subject with a considerable amount of empty space can make the subject more prominent.
- Creating Depth: Use techniques like shallow depth of field to create a sense of depth and dimension in the image. This can involve focusing on the foreground and letting the background blur, drawing attention to the foreground subject.

Accessories for Enhancing Macro Photography
Taking macro photos with an iPhone can be significantly improved with the right accessories. Beyond the inherent capabilities of the phone’s camera, external tools can enhance focus, lighting, and stability, unlocking a wider range of creative possibilities. These accessories provide crucial support for capturing detailed and compelling macro images.
Macro Lenses
Macro lenses, specifically designed for close-up photography, are a powerful tool for capturing intricate details. They offer a greater magnification than the phone’s native lens, allowing you to get closer to your subject and achieve a higher level of detail. However, macro lenses for smartphones often come with a trade-off in terms of field of view compared to the wider angle of the standard lens.
This means that while you gain remarkable detail, you might lose some of the broader context surrounding the subject.
Close-up Filters
Close-up filters, also known as close-up lenses, are affordable and versatile accessories. They screw onto the front of your phone’s lens and increase the magnification. These filters are typically less expensive than dedicated macro lenses and provide a good entry point for macro photography. A common drawback is the potential for reduced image quality due to light absorption by the filter, resulting in slightly darker or less vibrant images.
Tripods
Tripods are essential for macro photography, particularly when dealing with shallow depth of field and slow shutter speeds. They provide a stable platform for your iPhone, preventing camera shake and ensuring sharp images. This is crucial for macro photography, where even slight movements can blur the image. Tripods are vital for capturing clear and crisp macro shots, especially in low-light conditions.
Their stability is indispensable for achieving the sharp focus required in close-up photography.
Other Accessories
Other accessories such as lighting modifiers and reflectors can be used to enhance the lighting conditions for macro photography. These accessories can help to reduce harsh shadows, improve contrast, and create a more appealing image. Lighting is critical in macro photography, as it directly affects the details and textures of the subject. Proper lighting enhances the visual appeal of the macro subject.
| Accessory | Description | Pros | Cons |
|---|---|---|---|
| Macro Lens | A lens specifically designed for close-up photography. | High magnification, detailed images. | Can be expensive, often reduced field of view. |
| Close-up Filter | A filter that screws onto the front of the phone’s lens to increase magnification. | Affordable, versatile, easy to use. | Potentially reduces image quality, may cause vignetting. |
| Tripod | A stable support for your phone, preventing camera shake. | Essential for sharp images, especially in low light. | Can be bulky, may not be convenient for all situations. |
| Lighting Modifiers/Reflectors | Accessories for controlling light, such as softboxes or reflectors. | Improved lighting, reduced harsh shadows, better contrast. | Can be more expensive, adds bulk and complexity. |
Post-Processing Tips for Macro Images
Capturing sharp, detailed macro photos with your iPhone is only half the battle. Post-processing is crucial for bringing out the intricate beauty and maximizing the impact of your macro images. This step allows you to refine the image, enhancing its visual appeal and making it truly stand out. From subtle adjustments to more dramatic transformations, post-processing can significantly elevate your macro photography.
Basic Image Editing Techniques
Post-processing macro images often involves a series of adjustments to enhance contrast, clarity, and overall visual appeal. These adjustments are typically achieved using dedicated image editing software or apps. Basic editing techniques include cropping, straightening, and applying filters. Cropping allows you to focus on specific elements of the image, while straightening ensures that lines and horizons are correctly aligned.
Filters can provide a stylistic touch, such as a vintage effect or a black and white conversion.
Adjusting Brightness, Contrast, and Sharpness
Precise adjustments to brightness, contrast, and sharpness are vital in post-processing macro images. Brightness controls the overall lightness or darkness of the image, while contrast adjusts the difference between light and dark areas. Sharpness enhances the detail and clarity of the image. These adjustments should be made carefully, aiming for a balanced image that accurately reflects the scene while also adding visual interest.
Overly aggressive adjustments can result in a harsh or unnatural appearance.
Color Correction and Saturation Adjustments, How to take macro photos with iphone
Color correction and saturation adjustments are essential for achieving accurate and visually appealing colors in macro images. Color correction aims to neutralize or adjust unwanted color casts, such as a yellowish tint, that might have resulted from the lighting conditions. Saturation adjusts the intensity of colors, making them appear more vibrant or muted. Adjusting these parameters allows you to match the colors in the image to your vision or the mood you’re trying to convey.
Snapping amazing macro photos with your iPhone is surprisingly simple! Focus on the tiny details, like a spider’s web or a flower petal. While you’re mastering close-up shots, you might be interested in the latest Ford mobile app update, which now features driverless parking features. fords mobile app update new driverless parking features This is a game changer, right?
Then, get back to your macro photography – try experimenting with different lighting to enhance your images.
Examples of Before and After Images with Detailed Post-Processing Steps
Imagine a macro photo of a tiny flower. The before image might appear slightly underexposed, with muted colors and a lack of detail in the petals. Post-processing could involve increasing the brightness by +10%, increasing the contrast by +15%, and using a color correction filter to remove a slight greenish tint. Sharpness could be increased using a sharpening filter, ensuring the delicate details of the petals are clear.
The result would be a vibrant image with vivid colors and sharp detail, effectively showcasing the beauty of the flower.
List of Software and Apps for Post-Processing Macro Images
- Adobe Lightroom: A powerful and versatile software package offering comprehensive tools for image editing. It allows for precise control over various parameters, including brightness, contrast, color, and sharpness. It is known for its advanced features and is often used by professional photographers.
- Adobe Photoshop: A professional-grade photo editing software that offers extensive tools and capabilities. It allows users to perform complex adjustments, such as masking, cloning, and layer editing. It is commonly used for high-level image editing, often involving more complex tasks.
- Snapseed: A mobile-friendly app with an intuitive interface and various editing tools. It is perfect for on-the-go adjustments and provides a range of filters and effects for image enhancement.
- VSCO: A popular mobile app that provides various filters and tools for photo editing. It’s known for its aesthetic presets, offering a range of stylistic options for enhancing your macro images.
Examples of Macro Photography with iPhones
Mastering macro photography with an iPhone involves understanding the interplay of composition, lighting, and technical adjustments. This section presents compelling examples, showcasing how careful consideration of these elements can transform everyday subjects into captivating images. We’ll delve into the specific techniques employed in each example, providing insights into the creative choices and post-processing steps that contribute to the final aesthetic.
A Delicate Blossom
This image captures a single, vibrant flower in exquisite detail. The shallow depth of field isolates the flower, drawing the viewer’s eye to its intricate structure. The soft, diffused light highlights the delicate petals, emphasizing their texture and color. The use of a macro lens attachment significantly enhanced the image’s clarity and resolution. The post-processing involved a slight adjustment to contrast, and the selective use of sharpening tools to maintain the sharpness of the petals and the background blur.
Composition: The flower is centered in the frame, and the background is intentionally blurred to draw focus. The lighting emphasizes the flower’s texture.
Lighting: Natural light, filtered through a slightly overcast sky, provided soft, even illumination, minimizing harsh shadows.
Techniques: Using the iPhone’s macro mode and a macro lens attachment, the photographer achieved exceptional sharpness. The image was taken at close range to capture the detailed textures of the flower’s petals.
Post-Processing: Minor contrast and sharpening adjustments were made in post-processing to enhance the image’s visual appeal.
A Droplet’s Reflection
This macro shot captures a water droplet clinging to a leaf, highlighting the intricate details of its surface. The high resolution of the image reveals the subtle textures and patterns within the droplet. The use of a macro lens attachment improved clarity. The photographer used the iPhone’s auto-focus and macro mode to achieve sharp focus on the droplet. Post-processing involved minor adjustments to color saturation and contrast to emphasize the droplet’s transparency and the vibrant green of the leaf.
The photographer’s use of a macro lens attachment helped to enhance the resolution of the image, particularly the intricate details within the droplet.
Composition: The droplet is positioned centrally, with the leaf providing a natural frame. The lighting creates a striking contrast between the droplet and the leaf.
Lighting: Direct sunlight provided high contrast, highlighting the droplet’s reflection and the leaf’s texture.
Techniques: The iPhone’s macro mode and a macro lens attachment were utilized for close-up photography. The photographer employed a tripod for stability, ensuring sharp focus in the image. Post-processing involved color adjustments and a selective sharpening tool to refine the droplet’s shape and clarity.
Post-Processing: Minor adjustments to saturation and contrast were made to improve the visual appeal.
A Tiny Insect’s World
This image showcases a small insect on a flower, offering a glimpse into the intricate details of its world. The image’s clarity reveals the insect’s delicate features, including its antennae and legs. The photographer’s careful use of macro mode, along with a macro lens attachment, resulted in a sharp image. Post-processing involved a minimal adjustment of color balance to enhance the image’s visual appeal.
The image highlights the delicate features of the insect.
Composition: The insect is positioned within the frame, with the flower petals creating a natural backdrop. The lighting emphasizes the insect’s form.
Lighting: Soft, diffused natural light minimized harsh shadows, revealing the insect’s intricate details.
Techniques: The iPhone’s macro mode and a macro lens attachment were used to capture the insect in great detail. The photographer employed a tripod for stability and to ensure sharpness.
Post-Processing: Minor adjustments to contrast and sharpening were made to highlight the insect’s details.
End of Discussion
So, whether you’re a seasoned photographer or just starting out, this comprehensive guide equips you with the knowledge and techniques to capture breathtaking macro images with your iPhone. From mastering focus and lighting to understanding composition and post-processing, you’ll be well-prepared to transform your everyday moments into extraordinary macro masterpieces. Happy shooting!