


How to remove wallpaper? This guide provides a step-by-step approach to tackling this often daunting home improvement project. From prepping the room to choosing the right tools and techniques, we’ll cover everything you need to know to successfully remove wallpaper, whether it’s old vinyl, stubborn paper, or something in between. We’ll explore different wallpaper types and their specific removal methods, ensuring you have the knowledge to handle any situation.
We’ll also cover essential safety precautions, troubleshooting common issues, and preparing the walls for repair after the removal. This guide will walk you through the process from start to finish, providing detailed explanations and helpful tips to make your wallpaper removal experience as smooth and efficient as possible.
Introduction to Wallpaper Removal
Removing wallpaper can be a daunting task, but with the right tools and techniques, it can be a manageable DIY project. This process involves carefully detaching the wallpaper from the wall, preparing the surface for repainting or redecorating. Proper preparation is key to a successful removal, minimizing damage to the wall and ensuring a smooth transition to the next step.The process of wallpaper removal hinges on understanding the type of wallpaper you’re dealing with and the wall’s composition.
Different wallpaper types require different approaches, and ignoring these differences can lead to frustration and potential damage. Essential tools and materials are critical for efficient and safe removal.
Essential Tools and Materials
A successful wallpaper removal project relies on the right tools and materials. Having the necessary supplies beforehand prevents delays and ensures a smoother process. Common tools include a utility knife, putty knife, scraper, paint scraper, and a wallpaper steamer. Other essential materials include painter’s tape, plastic sheeting, and a bucket of warm water mixed with a wallpaper remover solution (or a specific product for the wallpaper type).
Different Wallpaper Types and Their Removal Methods
Wallpaper comes in various types, each with unique characteristics that influence the removal process. Understanding these differences is crucial to avoid damaging the wall and ensuring effective removal.
| Wallpaper Type | Removal Technique |
|---|---|
| Paste-the-wall (or paper-backed) wallpaper | This type of wallpaper is typically removed using a wallpaper steamer and a putty knife. The steamer softens the paste, making the wallpaper easier to peel away. Be cautious when using the steamer to avoid damaging the wall underneath. A scraper can also be used for stubborn sections. |
| Vinyl wallpaper | Vinyl wallpaper can be more challenging to remove. A combination of steaming, scraping, and a strong wallpaper remover solution might be necessary. If the vinyl is textured or has a thick layer, mechanical scraping may be required. |
| Non-woven wallpaper | Non-woven wallpaper is generally easier to remove than vinyl or paste-the-wall wallpaper. Often, it can be peeled off in large sheets, with little need for a steamer. A scraper may be helpful in removing stubborn sections. |
| Heavy-duty or textured wallpaper | Heavy-duty wallpaper may require a combination of methods. Steaming is often helpful to soften the adhesive, followed by scraping to remove the stubborn portions. A wallpaper remover solution may be essential for efficient removal. Thorough preparation is crucial. |
Considerations for Specific Wall Types
Different wall types may react differently to the wallpaper removal process. Plaster walls, for example, may require extra care to avoid damage during the removal process. Knowing the wall type can influence the choice of tools and techniques used. Care should be taken to avoid causing damage to the plaster or drywall.
Preparing the Room and Surface
Successfully removing wallpaper hinges on meticulous preparation. A well-prepared room minimizes damage to your walls and surrounding areas, ensuring a smooth and efficient removal process. Proper protection of furniture and flooring, along with careful masking of un-affected areas, will save you time and effort in the long run. This section Artikels the critical steps to prepare your room for wallpaper removal.Careful planning and execution during the preparation phase are essential for a successful wallpaper removal project.
This involves protecting your furniture, flooring, and other surfaces that you don’t want to be affected by the process. Proper masking ensures that these areas remain untouched, while safeguarding your valuable belongings.
Protecting Furniture and Flooring
Protecting your furniture and flooring is crucial to prevent damage during wallpaper removal. This involves strategic covering or moving items to avoid contact with water and potentially abrasive materials. Careful placement of drop cloths and other protective coverings minimizes the risk of staining or scratching.
Masking Un-Affected Areas
Masking un-affected areas is a vital step in the preparation process. This involves carefully covering areas that you want to remain untouched, like baseboards, doors, and trim. This step protects these surfaces from water damage and potential scratches or marks. High-quality painter’s tape, or specialized masking tape, is crucial for a clean and effective mask.
Preparing the Room for Wallpaper Removal, How to remove wallpaper
Proper room preparation is essential for a smooth wallpaper removal experience. This involves a systematic approach to protect your belongings and make the removal process as efficient as possible.
- Clear the room: Remove all furniture from the walls to be stripped, ensuring there’s ample space for working. This step significantly facilitates access and prevents damage to furniture. For example, if you’re removing wallpaper in a living room, move sofas, chairs, and other items out of the way. Consider temporary storage locations for these items.
- Cover furniture and flooring: Use drop cloths, plastic sheeting, or old blankets to cover all furniture and flooring. This step is vital to protect your belongings from water and debris. For example, cover your carpets with large sheets of plastic to avoid staining.
- Protect baseboards and trim: Cover baseboards and trim with masking tape or painter’s tape to prevent water or adhesive residue from damaging them. For example, apply masking tape carefully to the edges of the baseboards to create a barrier against water and other contaminants.
- Mask doors and windows: Cover doors and windows with plastic sheeting or drop cloths to prevent water from getting on them. This protects your doors and windows from water damage and adhesive residue.
- Prepare the walls: Thoroughly inspect the walls for any loose or damaged areas. Repair any holes or cracks in the wall surface to prevent water from penetrating. For example, use spackle and paint to cover any damaged areas on the wall before beginning the wallpaper removal process.
Removing the Wallpaper
Wallpaper removal can be a daunting task, but with the right techniques, it can be manageable. Careful preparation and the selection of appropriate tools are crucial for a successful and relatively pain-free experience. Understanding the various methods and their suitability for different wallpaper types is key to achieving a clean and efficient outcome.The process involves more than just ripping off the wallpaper.
Different types of wallpaper react differently to various removal methods. Selecting the right method for the specific wallpaper you’re dealing with will minimize damage to the wall and save time and effort. By following these steps, you can effectively remove wallpaper and prepare the wall for repainting or redecorating.
Soaking
This method involves saturating the wallpaper with water to loosen its adhesive bond. It’s often the gentlest approach, minimizing potential wall damage, especially for delicate or older wallpaper. The effectiveness of soaking depends heavily on the wallpaper’s composition and the adhesive used. Some wallpapers are designed to resist water damage, and soaking may not be effective.
Scraping
Scraping is a more forceful technique, ideal for removing tougher wallpaper types, like vinyl or heavy-duty paper. Using a putty knife or a scraper, you’ll remove the softened or loosened wallpaper in sections. This method is typically faster than soaking, but it requires more physical effort and can potentially damage the wall surface if not done carefully. A scraper’s edge should be kept sharp for efficient removal and minimal wall damage.
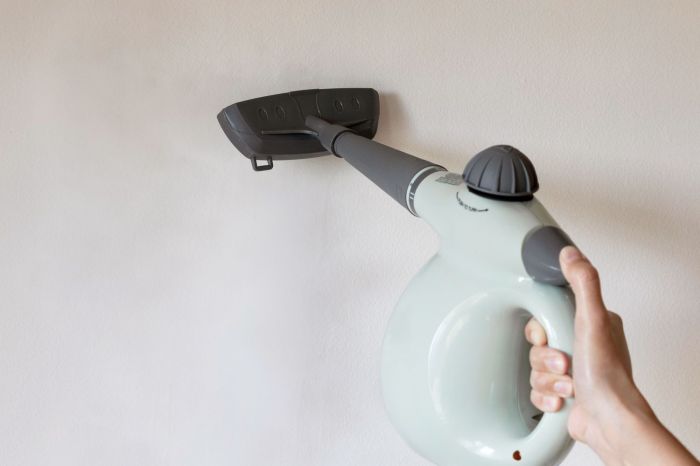
Steaming
Wallpaper steamers provide controlled heat and moisture to soften the adhesive, making removal easier. They are particularly effective for textured or patterned wallpapers. The controlled steam softens the glue without damaging the underlying wall surface, making it suitable for delicate walls. The temperature and duration of steaming should be adjusted depending on the type of wallpaper and wall.
Steaming is a versatile method, as it works well with a variety of wallpaper types, but it might require more time compared to scraping.
Removing wallpaper can be a real pain, but thankfully there are tons of helpful guides online. For example, you can check out some great tips on prepping your room for the job, and learning about different removal methods. Speaking of online resources, did you know that Twitter is testing the ability to edit replies to tweets? This could be a game-changer for social media, and you can read more about the Twitter edit testing replies tweets feature here.
Regardless of what you’re looking to share, having a solid strategy for removing wallpaper is still key!
Table of Wallpaper Removal Techniques
| Technique | Wallpaper Type | Effectiveness | Suitability | Advantages | Disadvantages |
|---|---|---|---|---|---|
| Soaking | Delicate, older papers, some types of non-vinyl | Moderate | Walls with delicate finishes | Gentle on the wall | Time-consuming, not suitable for all types |
| Scraping | Vinyl, heavy-duty papers, and difficult-to-remove wallpapers | High | Faster removal | Faster removal, effective on tough wallpapers | Potentially more damaging to the wall |
| Steaming | Textured, patterned, and some vinyl wallpapers | High | Delicate walls and intricate patterns | Gentle on the wall, good for intricate patterns | More time-consuming than scraping, needs careful adjustment |
Using a Wallpaper Steamer Effectively
A wallpaper steamer effectively softens the glue, making the wallpaper easier to remove. Ensure the steamer’s water reservoir is filled correctly. Position the steamer nozzle a few inches from the wallpaper and apply even, consistent pressure. Work in small sections to prevent the wallpaper from drying out too quickly. Let the steam penetrate the wallpaper thoroughly before attempting to remove it.
If the wallpaper doesn’t budge easily, increase the steaming time, but avoid prolonged contact to prevent damaging the wall.
Stripping wallpaper can be a real pain, but knowing the right techniques makes it much easier. First, you need to prep the surface, then apply the correct stripper. Interestingly, a recent fireside chat on the science fiction diversity numbers fireside report science fiction diversity numbers fireside report highlighted the lack of representation in a genre that often inspires creativity.
After the prep and stripping, a good clean-up is crucial for a smooth finish.
Troubleshooting Common Issues
Removing wallpaper can be a frustrating experience, especially when faced with stubborn adhesive or damaged walls. This section details common problems encountered during wallpaper removal and provides practical solutions for tackling these challenges. Knowing how to address these issues will save you time, effort, and potential damage to your walls.Dealing with stubborn wallpaper or damaged walls requires careful planning and the right tools.
A systematic approach, combining understanding the cause of the problem with the appropriate solution, is key to successful wallpaper removal. The following sections Artikel common issues and their solutions, helping you navigate the complexities of wallpaper removal with confidence.
Stubborn Wallpaper
Wallpaper often resists removal due to various factors, including the type of adhesive used, the age of the wallpaper, and the condition of the wall. Addressing these underlying causes is crucial to achieving successful removal. A thorough understanding of the specific issue will determine the best approach.
- Old Adhesives: Older wallpaper often utilizes stronger adhesives that have hardened over time. A longer soaking time, along with careful scraping and potential use of a wallpaper remover, may be necessary. Using a specialized wallpaper remover, like a paste or gel, can soften the adhesive, making it easier to remove the wallpaper in sections. For very stubborn cases, a wallpaper steamer may be effective in softening the adhesive.
- Damaged Walls: Walls with loose plaster or damaged surfaces may make wallpaper removal more challenging. In these cases, a gentler approach is recommended to avoid further damage. Carefully assess the wall’s condition before proceeding with the removal process. Using a putty knife or scraper with extreme caution is often needed.
- Wallpaper Type: Different wallpaper types exhibit varying levels of adhesion. For example, vinyl wallpaper tends to be more resistant to removal than non-vinyl varieties. Using the right tools, and understanding the type of wallpaper, is key to success. This includes the use of wallpaper remover solutions to loosen the adhesive bond.
Damaged Walls
Protecting the underlying wall during wallpaper removal is crucial. Certain techniques can minimize damage and preserve the wall’s integrity. Carefully assessing the wall’s condition and choosing the right tools will mitigate the risk of further damage.
- Loose Plaster: If the wall has loose plaster, it’s essential to approach the removal with caution to avoid further damage. Support the plaster with additional coverings or supports to avoid compromising the structural integrity of the wall. Apply the right pressure and tools when removing sections of wallpaper in these areas. Using a putty knife to gently remove the loose plaster can prevent more extensive damage to the wall.
- Holes or Cracks: Holes or cracks in the wall might indicate underlying structural issues. Addressing these issues prior to wallpaper removal is essential. Repairing the holes and cracks with appropriate materials before proceeding with the removal process will prevent further damage.
- Moisture Damage: If moisture damage is suspected, it’s crucial to address the source of the moisture before attempting wallpaper removal. Failing to do so may lead to further damage to the wall. Identifying and fixing the moisture problem is paramount.
Troubleshooting Table
| Problem | Solution |
|---|---|
| Stubborn wallpaper | Increase soaking time, use a wallpaper remover, and consider a wallpaper steamer. |
| Damaged walls (loose plaster) | Use caution, support the plaster, and consider repairing damaged areas before removing the wallpaper. |
| Holes or cracks in the wall | Repair the holes and cracks before starting wallpaper removal. |
| Moisture damage | Address the source of the moisture before attempting wallpaper removal. |
| Different types of wallpaper | Use the right tools and methods for the specific type of wallpaper to prevent damage to the wall. |
Safety Precautions
Removing wallpaper can be a messy and potentially hazardous task. Proper safety precautions are crucial to protect yourself from injuries and ensure a smooth, efficient, and injury-free removal process. Ignoring these precautions can lead to accidents, including cuts, chemical burns, and even falls.Careful planning and adherence to safety protocols are essential to mitigate risks and prevent unforeseen complications.
This section Artikels critical safety measures and equipment to ensure a safe wallpaper removal experience.
Essential Safety Gear
Proper safety gear is paramount for protecting yourself during wallpaper removal. This includes clothing that protects against debris and potential chemical exposure, as well as personal protective equipment (PPE) to safeguard your eyes, hands, and respiratory system.
- Eye Protection: Safety glasses or goggles are essential to shield your eyes from flying debris, dust, and potential splashes of chemicals used in the removal process. This is critical to prevent eye injuries, which can range from minor irritation to severe damage.
- Respiratory Protection: Dust and chemicals released during wallpaper removal can be harmful if inhaled. A dust mask or respirator is necessary to protect your lungs and prevent respiratory issues. The type of respirator needed depends on the specific chemicals used in the removal process. Consult safety data sheets (SDS) for the products used for appropriate respirator selection.
- Hand Protection: Gloves are crucial to prevent skin irritation or cuts from sharp objects or chemicals. Choose gloves made of materials that offer good protection against abrasions and chemicals. Thick nitrile or neoprene gloves are often recommended for wallpaper removal.
- Foot Protection: Wear sturdy, closed-toe shoes or boots to protect your feet from sharp objects and potential falls. Consider work boots if the floor is uneven or potentially hazardous.
- Protective Clothing: Wear long sleeves and pants to prevent cuts or skin irritation from sharp edges of wallpaper or debris. Consider an apron or coveralls to protect your clothing from staining and damage. Dark clothing is often preferred to make it easier to spot dust and debris.

Potential Hazards and Mitigation
Wallpaper removal can involve several hazards. Understanding these hazards and implementing appropriate mitigation strategies is key to minimizing risk.
- Chemical Exposure: Some wallpaper adhesives contain chemicals that can cause skin irritation or respiratory problems. Always wear appropriate protective gear and follow the instructions on the product labels carefully. Consult safety data sheets (SDS) for detailed information about handling and disposal of chemicals.
- Sharp Objects: Wallpaper remnants and adhesive strips can be sharp, posing a risk of cuts. Take extra care when handling these materials and use protective gear to avoid injuries.
- Falls: Working on ladders or scaffolding during wallpaper removal can lead to falls. Use proper scaffolding or ladders, ensure secure footing, and be cautious when moving around the room.
- Dust and Debris: Wallpaper removal generates significant dust and debris, which can irritate the respiratory system. Always wear appropriate respiratory protection and consider using a vacuum cleaner with a HEPA filter to capture dust effectively.
Safety Checklist
A well-structured checklist can ensure that all necessary safety measures are taken.
Removing wallpaper can be a messy but rewarding project. Start by prepping the area, covering surfaces you don’t want to get sticky residue on. For example, the Southern Nevada Health District southern nevada health district frequently posts helpful tips on handling potential contaminants during home improvement projects. Then, carefully loosen the paper and use a scraper to remove any stubborn pieces.
Finally, clean the walls thoroughly before painting or redecorating.
- Check the labels of all materials and consult safety data sheets (SDS) for specific safety precautions.
- Prepare the workspace by clearing the area and covering surfaces to protect them from damage.
- Ensure adequate ventilation to prevent the buildup of harmful fumes.
- Wear appropriate personal protective equipment (PPE), including safety glasses, gloves, and a dust mask.
- Inspect the ladder or scaffolding to ensure it’s stable and secure before use.
- Use caution when handling sharp objects or debris.
- Maintain a safe distance from any potential hazards.
- Report any accidents or injuries immediately to the supervisor or appropriate authority.
Specific Wallpaper Types: How To Remove Wallpaper
Wallpaper removal varies significantly based on the type of wallpaper applied. Understanding the composition of your wallpaper is crucial for choosing the right tools and techniques to avoid damage and ensure a smooth removal process. Different materials react differently to water, pressure, and scraping, affecting the overall efficiency and safety of the removal procedure.
Vinyl Wallpaper Removal
Vinyl wallpaper, a popular choice due to its durability and water resistance, requires careful consideration. Its strong adhesive bond often necessitates a more aggressive approach compared to paper-backed wallpapers. Applying water for extended periods, followed by a scraping motion, is a common method. The type of vinyl also matters; some are more flexible than others.
Paper-Backed Wallpaper Removal
Paper-backed wallpaper is generally easier to remove than vinyl. Its adhesive is often less tenacious, allowing for a more straightforward removal process. Applying water to soften the adhesive and gently scraping the paper away is usually sufficient. It is crucial to avoid excessive force to prevent tearing the wallpaper or the underlying wall surface.
Textured Wallpaper Removal
Textured wallpaper, known for its unique aesthetic, can present unique challenges during removal. The texture itself can sometimes create a complex surface, making it more prone to damage during the process. Carefully evaluate the texture before starting the removal process, as specific tools or techniques might be necessary to address the uneven surface without causing further damage.
Delicate or Fragile Wallpaper Removal
Delicate or fragile wallpaper types, such as those with intricate patterns or a thin backing, require a delicate touch. Water should be applied sparingly and gradually, allowing the adhesive to soften without damaging the wallpaper’s surface. Using a soft scraper or a specialized tool designed for delicate surfaces is highly recommended to avoid tears or damage.
Tools and Materials for Specific Wallpaper Types
Selecting the right tools and materials is vital for a successful wallpaper removal. For vinyl wallpaper, a stiff scraper, a putty knife, and a steamer or a spray bottle with a nozzle for focused water application are essential. For paper-backed wallpaper, a soft scraper, a putty knife, and a water-soaked sponge or spray bottle are often sufficient. Delicate wallpapers require specialized tools designed for gentle scraping and minimal pressure.
Comparison Table of Wallpaper Types and Removal Methods
| Wallpaper Type | Best Practices | Tools/Materials | Notes |
|---|---|---|---|
| Vinyl | Apply water for extended periods, then scrape. Consider a steamer. | Stiff scraper, putty knife, steamer/spray bottle | More challenging to remove than paper-backed. |
| Paper-backed | Apply water, then gently scrape. | Soft scraper, putty knife, water-soaked sponge | Generally easier to remove than vinyl. |
| Textured | Be cautious. Assess the texture before starting. Apply water carefully. | Specialized scraper for textured surfaces, water, potentially a steamer | May require specialized tools and extra care to avoid damage. |
| Delicate/Fragile | Apply water sparingly, use soft scraping tools, avoid excessive pressure. | Soft scraper, specialized tools for delicate surfaces, water | Prioritize gentle removal to avoid damage. |
Conclusive Thoughts
Successfully removing wallpaper requires careful planning, the right tools, and a methodical approach. This comprehensive guide has equipped you with the knowledge to tackle this task head-on. By following the steps and tips Artikeld, you can confidently remove any wallpaper and prepare your walls for a fresh new look. Remember safety first and always assess the situation. Happy renovating!