


How take screenshots android p – How to take screenshots on Android P? This guide dives deep into various methods for capturing those crucial screen moments, from the tried-and-true hardware shortcuts to advanced software techniques and even accessibility options. We’ll explore the nuances of different Android versions, from the fundamental process to more complex scenarios like grabbing scrolling content and multiple windows. We’ll cover everything, from basic methods to advanced techniques, making sure you can capture anything on your Android P device.
Understanding the different methods available for capturing screenshots on your Android P device is essential. This detailed guide will walk you through the steps for taking screenshots, providing clear instructions and examples. From the classic power button combination to more specialized software tools, we’ll explore the options and explain when each method is most effective. This comprehensive approach will empower you to master screenshotting on your Android P device, no matter your skill level.
Introduction to Android Screenshots
Capturing screen content on Android devices has become a fundamental part of daily tasks, from sharing app experiences to troubleshooting technical issues. This method of digital documentation is vital for many reasons, and understanding how screenshots work across different Android versions is crucial for smooth functionality and effective communication. Different methods for capturing screenshots have evolved alongside Android’s development, each tailored for a specific user experience.Knowing the various screenshot methods available on different Android versions is essential for a seamless user experience.
Different models and software updates might introduce new ways to capture screenshots. This knowledge empowers users to quickly and efficiently capture the information they need, improving productivity and problem-solving.
Screenshot Methods Across Android Versions
Understanding the evolution of screenshot methods across various Android versions is key to mastering this fundamental feature. This section details the different methods used, providing insight into the evolution of Android’s screenshot capabilities.
| Android Version | Method 1 | Method 2 | Method 3 |
|---|---|---|---|
| Android 10 | Simultaneously pressing the Power button and Volume Down button. | Using a dedicated screenshot button (if available on the device). | Employing an accessibility feature (e.g., for users with limited mobility). |
| Android 11 | Simultaneously pressing the Power button and Volume Down button. | Using a dedicated screenshot button (if available on the device). | Employing an accessibility feature (e.g., for users with limited mobility). |
| Android 12 and later | Simultaneously pressing the Power button and Volume Down button. | Using a dedicated screenshot button (if available on the device). | Employing an accessibility feature (e.g., for users with limited mobility). Some devices might also have a quick screenshot option via gestures. |
Common Use Cases for Android Screenshots
Android screenshots serve various purposes beyond simple image capture. These common use cases demonstrate the versatility of this fundamental feature.
- Sharing app experiences: Users can capture and share screenshots to demonstrate app functionalities or showcase unique experiences.
- Documenting problems: Screenshots are invaluable for troubleshooting technical issues by capturing error messages, app layouts, or specific UI elements.
- Capturing data: Users can take screenshots to document visual data, like game scores, charts, or important information displayed on the screen.
- Creating tutorials: Screenshots can be used to create step-by-step tutorials or guides, showcasing how to perform specific tasks on an app or system.
Importance of Knowing Various Screenshot Methods
Familiarity with various screenshot methods enhances user experience and problem-solving capabilities. This knowledge empowers users to effectively interact with their devices.
- Accessibility: Different methods cater to diverse user needs and abilities, ensuring inclusivity and ease of use.
- Efficiency: Knowing the appropriate method allows for quicker and more targeted screen captures, optimizing workflow and time management.
- Troubleshooting: Screenshots are critical tools for identifying and resolving technical issues, providing crucial visual context for support teams.
Hardware-Based Screenshot Methods

Android devices offer various methods for capturing screenshots, categorized broadly as hardware-based and software-based. Hardware methods leverage physical buttons, providing a quick and often intuitive way to capture the screen. Understanding these methods can be crucial for optimizing your workflow, especially in situations requiring rapid screen captures.Hardware-based methods generally use combinations of physical buttons like the power button and volume buttons.
This contrasts with software-based methods, which rely on menus or gestures, often requiring more steps.
Taking screenshots on Android P is a breeze, but did you know that some older PC versions of Fortnite might not be compatible with newer Windows versions? For example, if you’re having trouble with Fortnite on Windows 10, 7, or 8, you might run into issues, as detailed in this article about fortnite pc windows 10 higher 7 8 unsupported mega.
Fortunately, capturing those Android P screenshots is easy with a few simple key presses or gestures. Just remember your device’s specific instructions.
Common Hardware Screenshot Methods
Different Android devices often use similar but not identical combinations of buttons for taking screenshots. The most common hardware-based method involves simultaneously pressing the power button and the volume down button. This approach is widely used across numerous Android devices.
Steps to Take a Screenshot Using Power and Volume Down
Capturing a screenshot using the power and volume down buttons is straightforward. First, identify the physical buttons on your device. Then, press and hold the power button simultaneously with the volume down button. The device will typically respond with a visual or auditory cue, confirming the screenshot has been taken. The saved image is usually placed in a designated location within the device’s file system.
Comparison with Software-Based Methods
Hardware-based screenshot methods often offer a significant advantage in terms of speed compared to software-based methods. The rapid nature of pressing physical buttons is typically faster than navigating through menus or using on-screen gestures. However, the ease of use can vary depending on individual familiarity with the specific hardware combination for a particular device.
Hardware Combinations and Screenshot Functionality, How take screenshots android p
The table below Artikels common hardware combinations and their corresponding screenshot functionality on select Android devices. Note that these combinations may vary depending on the device’s manufacturer and model.
| Device | Method 1 | Method 2 |
|---|---|---|
| Samsung S22 | Power button + Volume down | |
| Google Pixel 7 | Power button + Volume down |
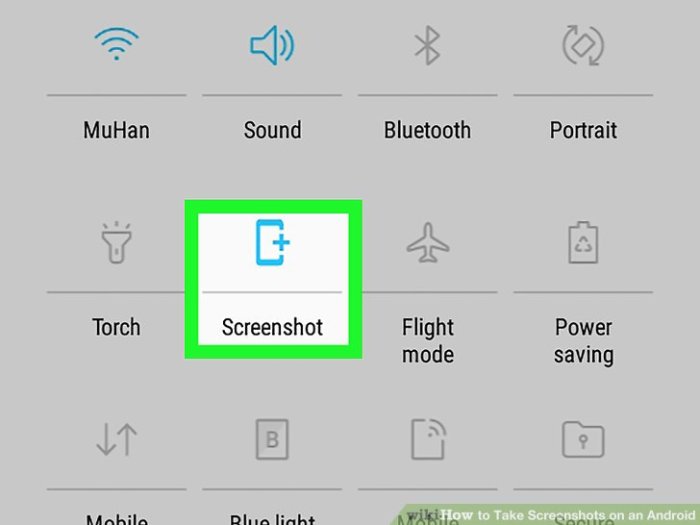
Software-Based Screenshot Methods
Software-based screenshot methods on Android offer a range of options beyond the hardware-accelerated approaches. These methods rely on applications or system features to capture the screen, providing flexibility and often more control over the capture process. This flexibility can include features like the ability to select specific regions or delay the capture.Software solutions often offer more advanced customization compared to hardware-based methods, enabling users to adjust settings or utilize additional functionalities.
These options can include the ability to capture specific regions of the screen or to schedule captures at predetermined intervals.
Accessibility Options for Screenshots
Android’s accessibility features provide a way to capture screenshots for users with disabilities or those who prefer alternative methods. These options can be especially helpful for users who have difficulty using standard screenshot methods.The accessibility options often involve interacting with assistive technologies or dedicated software that can be integrated into the system. Specific steps vary depending on the accessibility tools employed by the user’s device and Android version.
For instance, some accessibility tools might offer an option to take a screenshot through a voice command or by using a specific button combination.
Screenshot Apps
Numerous third-party apps are available on the Google Play Store for capturing screenshots. These applications extend the standard functionality, adding extra features like annotation tools, image editing options, and specific screen recording capabilities.The flexibility and customizability provided by these apps can be a significant advantage for users who require more advanced screenshot tools. Some apps even allow for the scheduling of screenshots or provide different capture modes for various screen elements.
The use of third-party apps allows for diverse methods, making screenshots more accessible and versatile.
Screenshot Options by Device
The available software options for capturing screenshots can vary slightly across different Android devices. This is often due to differences in the pre-installed software and the availability of third-party apps.
| Device | App 1 | App 2 | App 3 |
|---|---|---|---|
| OnePlus 11 | Screenshot Capture | Notability | Google Photos |
| Xiaomi 13 | Mi Screenshot Tool | Adobe Photoshop Express | Samsung Notes |
The table above provides a limited example of possible apps. The availability and popularity of these apps can change over time, and users should consult the Google Play Store for the most up-to-date options for their specific device.
Advanced Screenshot Techniques

Taking screenshots goes beyond capturing the entire screen. Android devices offer flexibility to capture specific areas, scrolling content, and even multiple windows simultaneously. Mastering these techniques unlocks powerful productivity and sharing capabilities.
Capturing Specific Areas
Android devices allow precise control over the screenshot area. This is particularly useful for capturing elements of a complex interface or a portion of a long web page without unnecessary background clutter. Different methods exist for achieving this depending on the device’s operating system version and the specific application. Often, a long-press or a combination of hardware keys will initiate a selection mode.
A rectangular frame appears on the screen, allowing you to adjust its size and position to encompass the desired area. This allows for focused captures, reducing file sizes and improving communication efficiency.
Capturing Scrolling Content
Capturing screenshots of long web pages or articles that extend beyond the visible screen area can be cumbersome with a single capture. Modern Android devices offer a solution. A common method involves capturing a series of screenshots and then stitching them together into a single image. This often requires a separate app or feature, as opposed to using standard screenshot tools.
The software typically automatically detects the scroll area and captures consecutive frames. Users need to manually trigger the capturing of multiple screenshots, then the application or OS will combine them into one continuous image.
Capturing Multiple Windows or Apps
Capturing screenshots of multiple apps or windows simultaneously is a useful tool for showcasing a workflow or demonstrating a complex process. Android devices, depending on their OS version, can sometimes directly capture multiple windows. Alternatively, specific applications might offer this functionality. Some advanced screen recording apps can simultaneously capture the screen of multiple applications. This technique allows for showcasing multiple apps in a single image or video, saving time and improving communication.
Capturing Different Screen Portions
Taking screenshots of varying screen areas is vital for effective communication and sharing. Here’s a breakdown of different methods:
- Entire Screen: This is the most basic technique, capturing the entire visible display. The standard screenshot method typically captures the entire screen in one step. This is suitable for capturing the overall layout or a full-screen image. For example, capturing a full-screen game image.
- Specific Portion: This technique focuses on a particular section of the screen. The device typically provides a selection tool, allowing you to Artikel the desired area for capture. This method is ideal for highlighting specific UI elements or data fields. For example, capturing a table from a spreadsheet.
- Scrolling Page: For lengthy documents, articles, or web pages that extend beyond the screen’s boundaries, taking a single screenshot is often inadequate. The method often involves capturing the page in multiple sections and combining them into one continuous image. This is crucial for capturing complete content of a long article, or a detailed report.
Screenshot Editing and Sharing
Taking a screenshot is just the first step. The real power comes from being able to manipulate and share those captured moments. This section will explore various methods for editing and disseminating your screenshots, making them more engaging and easily shareable.Beyond simply capturing the screen, we can enhance and distribute these images for a more powerful impact. From basic adjustments to advanced techniques, this section provides the tools and knowledge to transform your screenshots into compelling visuals.
Common Screenshot Editing Methods
Various tools offer ways to refine screenshots. Basic editing often involves cropping, resizing, and adjusting brightness. More advanced methods include adding annotations, text overlays, and applying filters to customize the image’s appearance.
Taking screenshots on Android P is pretty straightforward. Just use the power button and volume down buttons simultaneously. But if you’re looking for a phone that’s hot or not, check out the latest buzz around the OnePlus 10T in this poll: poll oneplus 10t hot or not. It’s a great way to see what other people think and then get back to easy Android P screenshotting!
Step-by-Step Screenshot Sharing Guide
Sharing screenshots efficiently is crucial for communication and collaboration. Follow these steps for smooth sharing:
- Open the screenshot app or gallery where you saved the image.
- Locate the desired screenshot and select it.
- Choose the sharing method (e.g., email, messaging apps).
- Select the recipient and customize the message (optional).
- Click the send button to share the screenshot.
Saving Screenshots in Different Formats
Different formats cater to different needs. PNG is generally preferred for images with complex graphics or transparency, while JPG is better suited for photos and images with less detail. Choose the format that best suits your needs.
Sharing Screenshots via Various Apps
Various apps offer streamlined sharing options. Email allows for sending screenshots to multiple recipients, while messaging apps offer instant sharing with contacts. Consider the context and audience when selecting a sharing method.
- Email: Select “Attach” within the email application and locate the screenshot in your gallery or file manager. This method allows for broader distribution and is suitable for formal communication.
- Messaging Apps (WhatsApp, Telegram, etc.): These apps have integrated sharing capabilities. Select the desired contact or group and tap the “Attach” option to choose the screenshot.
- Social Media Platforms (Twitter, Facebook, etc.): Screenshots can be directly uploaded or shared using the platform’s built-in sharing features. This method is effective for reaching a wider audience.

Screenshot Editing Tools
Various tools cater to different editing needs.
Taking screenshots on Android P is pretty straightforward, just like most Android versions. You’ll likely find the process is even simpler with your new OnePlus Nord 3 5G, especially after checking out the oneplus nord 3 5g uk launch details. Basically, you’ll find a power button and volume down combination for most models, or an on-screen button if you prefer.
It’s a pretty easy task, even for tech newbies!
| Tool | Feature 1 | Feature 2 |
|---|---|---|
| Screenshot Tool (Built-in) | Image cropping | Basic image adjustments (brightness, contrast) |
| Photo Editor (e.g., Photoshop Express, PicsArt) | Advanced image manipulation (layers, filters) | Image resizing, color correction, and special effects |
| Graphics Editor (e.g., GIMP) | Advanced image editing, including vector graphics | Precise control over image elements |
Accessibility Options for Screenshots
Taking screenshots on Android devices is now more accessible than ever, thanks to built-in and third-party accessibility features. These features cater to a wide range of disabilities, enabling users to capture images of their screens and share them with others. This section dives into the various accessibility options and how to utilize them effectively.Accessibility features for screenshots are crucial for users with visual impairments, motor skill limitations, or cognitive differences.
They provide alternative methods for capturing and managing screenshots, ensuring inclusivity in the digital experience.
Enabling Accessibility Options for Screenshots
The process for enabling accessibility features for screenshots varies slightly depending on the specific accessibility options available and the Android version. However, the fundamental principle remains the same: locate the accessibility settings within the device’s settings menu.
Accessibility Options for Different Android Versions
Different Android versions may present the accessibility options in slightly different layouts and menus. The general procedure, however, remains consistent. Users should locate the accessibility settings within the device’s settings menu.
Android 10 Screenshot Accessibility
To enable accessibility options for screenshots on Android 10, navigate to Settings > Accessibility > Accessibility options. Within the accessibility options, find the specific settings for screen reader or other accessibility tools. Different tools might have different methods for taking screenshots. The screen reader may provide commands or button presses to trigger the screenshot.
Android 11 Screenshot Accessibility
Android 11 follows a similar structure. Navigate to Settings > Accessibility > Accessibility options. The interface for accessing and configuring screenshot options might be slightly altered but should generally be straightforward. Look for specific features dedicated to users with disabilities.
Android 12 and Beyond Screenshot Accessibility
Android 12 and later versions maintain the core concept of locating accessibility options within the settings menu. The exact layout may change, but the fundamental principle of finding and enabling relevant features remains the same.
Specific Accessibility Features and Their Usage
Several accessibility features directly relate to taking screenshots. Screen readers, for example, can provide auditory feedback when a screenshot is taken, which is valuable for visually impaired users. Customizable button mapping allows users with motor limitations to trigger screenshots using alternative input methods.
Example: Using a Screen Reader for Screenshots
A screen reader can announce the action of taking a screenshot and provide details about the captured image. This allows visually impaired users to confirm the screenshot has been successfully taken. The screen reader might also allow users to save or share the screenshot with custom commands.
Example: Customizing Button Mapping for Screenshots
A user with limited motor skills might customize the button mapping in the accessibility settings to trigger a screenshot by pressing a specific combination of keys or by using an alternative input method like a voice command. This ensures the user can control the screenshot process effectively.
Troubleshooting Screenshot Issues
Taking screenshots on Android is usually straightforward, but occasional problems can arise. This section delves into common screenshot issues and provides practical solutions to get you back to capturing those important moments. Understanding these potential roadblocks can save you time and frustration.Often, the root cause of screenshot problems lies in device settings, application compatibility, or even temporary software glitches.
Troubleshooting involves systematically identifying the source of the issue and applying the appropriate corrective action. This guide provides a structured approach to resolving these issues.
Common Screenshot Issues and Solutions
Troubleshooting screenshot issues involves systematically identifying the source of the problem and applying appropriate solutions. This section details common problems and their resolutions.
- No Screenshots Captured: This issue could stem from a variety of factors, including incorrect settings, compatibility problems with specific apps, or hardware limitations. To resolve this, first, ensure the screenshot functionality is enabled in the device’s settings. Check if any recently installed apps might be interfering. Restarting the device is often a simple yet effective solution for resolving temporary software glitches.
If the problem persists, consider contacting device support for further assistance.
- Corrupted Screenshot Images: Screenshot corruption can manifest in various ways, from blurry images to incomplete captures or file format errors. Ensure the device’s storage is not full or fragmented. Clear cache and data for the camera or screenshot-related apps. Try updating the device’s operating system to the latest version, as bug fixes can resolve underlying issues. If corruption persists, examine the device for physical damage, which might be causing malfunction.
If none of these steps resolve the problem, the device might need professional repair.
- Screenshots Not Saving: The screenshot might not be saving to the intended location or in the expected format. Verify the device’s storage settings. Ensure the chosen storage location is accessible and has sufficient space. Review app permissions for access to storage, which might be required for saving screenshots. Restart the device and try again.
If these methods fail, check if any app conflicts exist.
- Screenshot Issues with Specific Apps: Certain apps might not support or behave unexpectedly when it comes to screenshots. This can be due to app-specific limitations. Check the app’s documentation or support forum for any known compatibility issues. Some apps may have built-in limitations on screenshot functionality. If possible, try taking a screenshot using a different method or a different app, to determine if the problem is isolated to a specific application.
Advanced Troubleshooting Steps
When basic troubleshooting fails, more advanced steps can help diagnose and resolve complex screenshot issues. These steps require a more technical approach.
- Checking Device Logs: System logs can provide valuable insights into potential errors. Access device logs and look for error messages related to screenshots or related functionalities. This may indicate underlying software problems requiring a more in-depth analysis or further troubleshooting.
- Performing a Factory Reset (Last Resort): If all other troubleshooting steps fail, consider a factory reset as a last resort. A factory reset restores the device to its original settings, potentially resolving deeply rooted issues. Back up your data before performing a factory reset to avoid losing important information. Be aware that a factory reset might not always fix screenshot issues. This is an extreme measure that should only be considered after exhausting other options.
Last Point: How Take Screenshots Android P
In conclusion, capturing screenshots on Android P devices is a straightforward process, offering a variety of methods tailored to different needs and devices. Whether you need to capture a single screen, a scrolling page, or multiple windows, there’s a method here that fits your needs. We’ve covered everything from basic hardware combinations to sophisticated software solutions, and explored the role of accessibility options.
Mastering these techniques will allow you to effectively capture and share crucial screen information on your Android P device.