

How prevent site notification popups google chrome is a common issue for many users. These persistent pop-ups can be distracting and annoying, interrupting your browsing experience. This guide will walk you through various methods to manage and disable these notifications, giving you back control of your browsing session.
Understanding how notifications work in Chrome, identifying their sources, and mastering the settings to manage permissions are key steps to regaining a smooth browsing experience. We’ll cover everything from basic settings adjustments to more advanced techniques involving extensions and troubleshooting persistent problems.
Understanding Notification Popups in Google Chrome
Browser notifications are a convenient way for websites to alert you to updates, messages, or other important information. They can be incredibly useful for staying informed, but they can also be intrusive if not managed carefully. This section delves into the inner workings of these popups, providing a clear understanding of their functionality, types, and settings within Google Chrome.Chrome notifications operate on a permission-based system.
Websites need your explicit approval to display notifications. This security measure protects your privacy and prevents unwanted interruptions. Once permission is granted, the notification system acts as a conduit for timely communication between websites and your browser.
Tired of those pesky site notification popups in Chrome? Thankfully, Google recently addressed some privacy concerns with a fix for those annoying intrusions. This is great news, as the new update to Chrome (check out the details in this article on how Google finally fixed annoying privacy invading feature chrome google finally fixes annoying privacy invading feature chrome ) makes managing those permissions much easier.
Now, you can regain control over your browser and avoid unwanted notifications, a real game-changer for a smoother online experience.
How Browser Notifications Function in Chrome
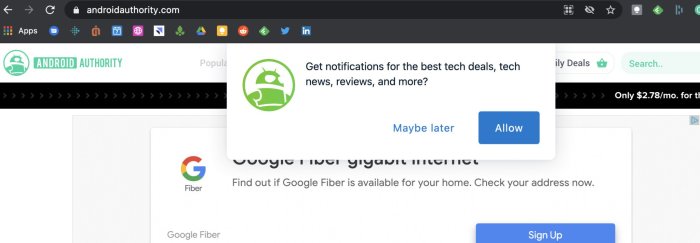
The fundamental mechanism involves websites requesting permission to send notifications. These requests appear as prompts within the browser, allowing you to either grant or deny access. If permission is granted, the website can then utilize the notification system to display alerts. This process is carefully orchestrated by the browser to prevent misuse.
Types of Notification Popups in Chrome
Notification popups in Chrome can vary in appearance and content depending on the originating website and its intended purpose. These popups usually contain a title, a message, and often an action button for further engagement. The messages may range from simple updates to more complex information, reflecting the diversity of web applications.
User Settings and Options Related to Notifications
Chrome offers a comprehensive set of settings for managing notifications. These settings allow you to control the types of notifications you receive, the appearance of those notifications, and even the sounds they trigger. Understanding these options empowers you to personalize your notification experience.
Notification Settings Table
| Setting | Description | Default Value |
|---|---|---|
| Notification Permission | Allows or blocks notifications from specific websites. | Allow/Block (depends on website) |
| Notification Sounds | Enables or disables notification sounds. | Enable |
| Notification Appearance | Customize the visual presentation of notifications, including color schemes, icons, and text formatting. | Default |
Identifying Notification Sources
Unwanted notifications can be a real pain, disrupting your browsing experience and potentially even leading to security concerns. Knowing where these notifications originate is crucial for controlling them and ensuring a smoother online journey. This section delves into the common culprits behind these pesky pop-ups and provides methods to pinpoint their source.Understanding notification sources helps you address the issue at its root.
This empowers you to selectively manage permissions and block unwanted notifications, regaining control over your browser. Knowing the source also provides insight into the nature of the notification and helps determine if it’s legitimate or malicious.
Common Sources of Unwanted Notifications
Unwanted notifications can stem from various sources. These range from legitimate websites to malicious actors trying to exploit your browser’s notification system. Identifying the source is the first step towards effective management.
- Websites: Many websites use notifications to announce updates, new content, or important information. While often helpful, some websites send excessive or irrelevant notifications, which can become a nuisance. A common example is a news website sending constant alerts for every new article.
- Extensions: Extensions, small programs that add functionality to your browser, often require notification permissions. Some extensions may send notifications that you don’t need or want, leading to a cluttered notification system. A frequent example is an extension for a specific social media platform that sends notifications for every post.
- Applications: Desktop applications that integrate with your browser may also use notifications. This can happen when an app has a notification feature or is tied to a browser extension.
- Malicious actors: Phishing websites or malicious extensions may send notifications to trick you into providing sensitive information or clicking on harmful links. Such notifications can be disguised to look legitimate, making them especially dangerous.
Determining the Website or Application Triggering a Notification
Google Chrome provides a mechanism to see which sites and apps have sent notifications. This feature is crucial for identifying the source of unwanted notifications.
- Chrome Settings: Accessing the notification settings within Chrome allows you to view a list of websites and apps that have requested notification permissions. This list clearly shows the source of each notification.
- Notification History: Chrome keeps a record of past notifications. This history can be used to pinpoint the website or application responsible for a specific notification, particularly useful for identifying recurring issues.
Methods for Finding the Source of Specific Notifications
Identifying the source of a specific notification requires a systematic approach. Several methods can be employed to trace the origin of the notification.
- Reviewing recent notifications: Carefully examining the notification history within Chrome settings is the first step. The notification history shows the sender’s name and the time of the notification. This is valuable for recognizing patterns and identifying recurring notifications.
- Checking the notification itself: The notification itself often contains clues about its origin. The sender’s name or website URL can provide immediate identification.
- Using the browser’s developer tools: Advanced debugging tools allow you to monitor network activity and identify the website or extension initiating the notification request. This method provides insights into the technical aspects of notification requests, enabling a more thorough analysis.
Potential Causes for Persistent Notifications
Persistent notifications, those that keep appearing despite your attempts to block them, can stem from various issues.
- Incorrect settings: Incorrect settings in your notification preferences may cause a website or extension to send notifications even if you’ve blocked them.
- Malfunctioning extensions: A faulty extension may be sending notifications unexpectedly.
- Browser issues: Problems with your browser’s notification handling can lead to persistent notifications from various sources.
- Third-party applications: Integration between your browser and third-party applications may trigger notifications that you are unaware of.
Categorization of Notification Sources
The following table categorizes notification sources based on their type.
| Type | Source Examples |
|---|---|
| Website | News sites, social media platforms, online stores |
| Extension | Social media notifications, productivity tools, ad blockers |
| Application | Email clients, messaging apps, cloud storage |
| Malicious Actors | Phishing websites, malicious extensions, fake notifications |
Managing Notification Permissions
Taking control of notification pop-ups in Chrome is crucial for a smoother browsing experience. Constantly bombarded with unwanted alerts can quickly become a major distraction. Learning to manage these permissions empowers you to curate your digital environment, allowing you to focus on the content that truly matters.
Revoking Notification Permissions for Websites
Understanding how to revoke notification permissions for specific websites is essential for maintaining a clutter-free browsing experience. This process allows you to regain control over the notifications you receive and tailor your browsing experience to your preferences.
To revoke notification permissions, follow these steps:
- Open Chrome Settings. Locate the settings icon (three vertical dots) in the top right corner of your Chrome browser window and select “Settings.”
- Locate the Notifications section. Within the settings menu, search for and locate the “Notifications” section. This section will typically be found under the Privacy & Security or a similar category.
- Manage Permissions for Specific Websites. Select the website for which you wish to revoke notification permissions. A list of websites that have requested notification permissions will be displayed. Select the specific website from the list.
- Revoke Permission. Within the website’s notification settings, you’ll find an option to revoke permission for notifications. Select this option to disable notifications from that particular website. You may see a confirmation prompt to ensure you want to disable notifications for that site.
Disabling Notifications for Extensions
Chrome extensions can also request notification permissions. Managing these permissions ensures that extensions don’t unexpectedly interrupt your workflow. Properly managing permissions for extensions allows you to keep your browser experience clean and efficient.
To disable notifications for extensions:
- Open Chrome Settings. Locate the settings icon (three vertical dots) in the top right corner of your Chrome browser window and select “Settings.”
- Locate the Notifications section. Within the settings menu, search for and locate the “Notifications” section. This section will typically be found under the Privacy & Security or a similar category.
- Manage Permissions for Extensions. In the notifications settings, locate the section specifically dedicated to managing permissions for extensions. This is often represented by a separate tab or section within the notifications settings.
- Disable Notifications. Select the extension for which you wish to disable notifications. You should find a toggle or similar control to disable notification permissions for that specific extension.
Notification Settings Location in Chrome
Knowing the precise location of notification settings in Chrome is crucial for swiftly managing permissions. The location of these settings can vary slightly depending on the Chrome version you’re using.
The notification settings are typically found within the Chrome settings page under the “Privacy and Security” section, or a similar category. Look for a dedicated section labeled “Notifications” or a similar term.
Tired of those pesky site notification popups in Google Chrome? Learning how to manage them is easier than you think. While exploring different phone options, understanding the OnePlus phone lineup is key, especially if you’re looking for a sleek and powerful device. For detailed info on the various OnePlus phones, check out this helpful guide: understanding oneplus phone lineup.
Once you’ve got your phone sorted, you can get back to blocking those unwanted notifications and enjoying a smoother browsing experience in Chrome.
Table of Revoking Notification Permissions
| Step | Action | Description | Screenshot |
|---|---|---|---|
| 1 | Open Chrome Settings | Navigate to the Chrome settings page. This is done by clicking the three vertical dots in the top right corner of the Chrome window. | Imagine a screenshot of the Chrome settings page here. It would show the typical Chrome settings page with various options. |
| 2 | Locate Notifications | Within the Chrome settings page, find the “Notifications” section. It might be nested under a broader category like “Privacy and Security.” | Imagine a screenshot of the Chrome settings page, zoomed in to show the “Notifications” section. |
| 3 | Manage Permissions | Select the specific website or extension for which you want to manage notification permissions. This step will typically display a list of websites or extensions that have requested notification permissions. | Imagine a screenshot showing a list of websites or extensions with checkboxes to enable or disable notifications. |
Blocking or Preventing Unwanted Notifications: How Prevent Site Notification Popups Google Chrome
Dealing with incessant notification pop-ups can be frustrating. This section delves into effective methods for blocking or preventing unwanted notifications from specific websites or applications, utilizing Chrome’s built-in features and helpful extensions. Learning these strategies will empower you to reclaim control over your browsing experience.Unwanted notifications, while often unintentional, can significantly disrupt your workflow and focus. By understanding and implementing these blocking techniques, you can maintain a more productive and enjoyable browsing environment.
Tired of those pesky site notification popups in Google Chrome? You’re not alone! Fortunately, there are simple ways to manage them. Figuring out the best Garmin watch for your needs can be a bit of a minefield, though. If you’re looking to upgrade your fitness tracking, consider checking out this helpful guide to find the right Garmin Forerunner model for you: which garmin forerunner model right me.
Once you’ve got your ideal watch sorted, you can focus on blocking those unwanted notifications and have a more streamlined web experience.
Built-in Chrome Notification Blocking
Chrome provides built-in mechanisms to manage notification permissions. This allows for granular control over which websites and applications can send you notifications. Directly managing these permissions often offers the most straightforward and effective approach to blocking unwanted notifications.
- Accessing Notification Settings: Open Chrome’s settings. Search for “notifications” and select the relevant option. This page typically allows you to review and modify notification permissions for individual websites.
- Disabling Specific Notifications: On the notification settings page, you can individually disable notifications from specific websites. This is a targeted approach, allowing you to retain notifications from sites you want while blocking those that are disruptive.
- Blocking All Notifications From a Website: For websites consistently sending unwanted notifications, completely disabling notifications for that site is a more permanent solution. This can be achieved through the notification settings page by selecting the appropriate option.
Using Extensions for Notification Blocking
Chrome extensions provide a powerful and flexible approach to controlling notifications. Many extensions offer features beyond Chrome’s built-in tools, providing more comprehensive control over notification management.
- Comprehensive Notification Management: Some extensions provide a centralized interface to manage notifications from all websites, offering greater control over notification frequency and types. These extensions might include filtering or scheduling features, enabling greater customization and control.
- Third-party Extensions: A vast library of extensions are available to manage notification settings. Users can select extensions specifically designed for notification management, which may include more advanced filtering options or integration with other productivity tools.
- Customizable Filtering: Several extensions allow users to customize filtering rules for notifications, enabling them to block notifications based on specific s, domains, or time schedules. This personalized filtering significantly reduces the number of disruptive notifications.
Comparing Blocking Approaches
Different methods for blocking notifications offer varying levels of control and customization. Choosing the appropriate approach depends on the specific needs and desired level of control.
| Method | Pros | Cons |
|---|---|---|
| Built-in Chrome Settings | Simple, straightforward, readily available | Limited customization, may not address all notification types |
| Extensions | Advanced filtering, comprehensive control, potential integration with other tools | Requires installing and managing extensions, potential compatibility issues |
Troubleshooting Persistent Notification Issues
Persistent notification issues in Google Chrome can be frustrating, often leaving you with unwanted pop-ups or a complete lack of notifications from certain websites. This section dives into common problems, potential causes, and practical troubleshooting steps to help you regain control over your browser’s notification settings.Understanding the root cause is crucial to resolving these issues. Sometimes, a simple setting change can resolve the problem, while other times, a deeper dive into browser configurations or even system-level issues might be required.
Common Persistent Notification Problems
Persistent notification problems often stem from misconfigured browser settings, conflicting extensions, or even cache and cookie issues. Identifying the specific cause is the first step towards a solution.
Potential Causes of Notification Issues
Several factors can lead to persistent notification problems. These include:
- Conflicting Extensions: Certain extensions might interfere with the notification system, either blocking or overriding the default settings. This can cause pop-ups to appear even when you’ve disabled them or prevent notifications from certain websites from appearing.
- Corrupted Browser Cache and Cookies: Accumulated cache and cookies can sometimes become corrupted, leading to issues with notification settings. This might result in incorrect storage of notification permissions or prevent the browser from properly applying the chosen settings.
- System-level Issues: In rare cases, system-level problems (like network connectivity issues or problems with the operating system) can also affect the browser’s ability to handle notifications correctly. This is less common but worth considering if other applications on your system are also exhibiting similar issues.
- Incorrect Browser Settings: A misconfigured setting within the browser itself can also result in persistent notification issues. This might be an incorrect setting for a specific website or a global setting that is inadvertently interfering with notifications.
Troubleshooting Steps, How prevent site notification popups google chrome
These steps provide a structured approach to resolving persistent notification issues:
- Check for Conflicting Extensions: Temporarily disable or uninstall any recently installed extensions to see if they are the culprit. If disabling an extension resolves the issue, you know it’s the source of the problem and can then decide whether to keep or remove the extension.
- Clear Browser Cache and Cookies: Clearing the browser’s cache and cookies can often resolve issues related to persistent notifications. This action removes outdated or corrupted data that might be interfering with the notification settings.
- Review Website Settings: Double-check the notification settings directly on the websites you are having trouble with. Ensure the permission request is correctly displayed and the settings are as expected. Many websites have their own settings to manage notifications.
- Restart the Browser: Sometimes, a simple restart of the browser can resolve temporary glitches and restore proper notification functionality. Restarting the browser will clear any temporary files that might be causing the issue.
- Check System Issues: If other applications are exhibiting similar issues, check for any known operating system or network problems. This step is less common, but can be helpful to isolate whether the issue is browser-specific or related to broader system functionality.
Clearing Browser Cache and Cookies
Clearing the browser cache and cookies is a common troubleshooting step. This process removes temporary data that the browser stores, which can sometimes interfere with notification settings. The specific steps vary depending on the browser, but usually involve navigating to the settings and locating the option to clear browsing data.
Common Notification Issues and Solutions
This table provides a quick reference for common notification issues and their corresponding solutions.
| Issue | Solution |
|---|---|
| Notifications from a specific site are not working. | Review the site’s notification settings and ensure permissions are granted in the browser. Clear cache and cookies for that site if necessary. |
| Notifications from all sites are not working. | Check for conflicting extensions, clear browser cache and cookies, and restart the browser. If the issue persists, consider checking system-level problems. |
| Unwanted notifications keep appearing. | Review notification settings for websites and disable any unnecessary notifications. Check for conflicting extensions. |
Preventing Notifications from Specific Websites

Tired of those pesky notifications popping up from websites you barely visit? Controlling which sites can send you alerts is crucial for a smoother browsing experience. This section details how to block notifications from specific websites in Google Chrome. Understanding these methods allows you to regain control and personalize your browsing environment.Blocking notifications from specific websites is a straightforward process.
You can effectively manage which websites are allowed to send you notifications, ensuring a more controlled and less disruptive browsing experience. This often involves navigating to the website’s notification settings within your browser.
Methods for Disabling Notifications
Controlling notification permissions is essential for a more streamlined and less distracting browsing experience. Chrome provides various options to manage which sites can send you notifications. The methods described below allow you to fine-tune your notification settings, preventing unwanted alerts and enhancing your online experience.
- Using the Chrome Settings Menu: This method offers a centralized way to manage notification permissions for all websites. It’s a comprehensive approach to controlling which sites can send you alerts.
- Directly on the Website: Some websites have their own notification settings pages. These pages allow for more granular control, enabling users to manage permissions on a site-by-site basis. Direct access often provides more refined control over notification preferences.
Blocking Notifications in Chrome Settings
Chrome’s settings provide a convenient way to manage notification permissions for individual websites. This approach allows for a centralized control panel for managing notification preferences for all websites you visit. This provides a more structured and organized approach to managing website notifications.
- Open Chrome Settings: Click on the three vertical dots in the top right corner of the Chrome window to open the settings menu.
- Navigate to Notifications: In the settings menu, search for “notifications” or scroll down to find the “Notifications” section. The exact location might vary slightly based on the Chrome version.
- Identify the Website: Look for the list of websites that have requested notification permissions. The list displays websites that have requested permission to send notifications.
- Disable Notifications: Next to each website, you’ll see a toggle. Turn the toggle off to disable notifications for that specific website. This action will prevent further notifications from that website. A toggled-off notification option indicates that notifications from that site have been disabled.
- Save Changes: Click “Done” or the equivalent button to save your changes. After saving your changes, notifications from the selected website will be blocked.
Example: Blocking Notifications for a Specific Website
To illustrate the process, let’s assume you want to disable notifications from example.com.
- Open Chrome and navigate to the example.com website.
- Locate the three vertical dots in the top right corner of the Chrome window.
- Click the three dots to open the settings menu and select “Settings”.
- Search for “notifications” or scroll down to the “Notifications” section. This section displays notification permissions for various websites.
- Find example.com in the list. This step involves locating the website in the list of websites that have requested notification permissions.
- Turn the toggle next to example.com to the “Off” position.
- Click “Done” or the equivalent button to save the changes.
Extension-Based Solutions for Notification Control

Chrome extensions offer a powerful layer of customization, including granular control over website notifications. Beyond the built-in browser settings, extensions provide additional tools and options for managing notifications, allowing for more tailored and specific blocking and filtering capabilities. This approach empowers users to manage notifications effectively and prevents unwanted interruptions.Extensions provide an alternative approach to managing notifications, supplementing the built-in browser options.
They often offer more advanced filtering and customization options, allowing users to fine-tune their notification experience beyond the basic browser controls. This can be particularly useful for users who interact with numerous websites or have complex notification preferences.
Popular Notification Control Extensions
A number of extensions offer enhanced notification management. These extensions go beyond the basic browser settings, providing additional features and flexibility for managing unwanted alerts. They typically provide more granular control, allowing users to block or filter notifications based on specific websites or criteria.
- Notification Blocker: This extension allows users to block notifications from specific websites or categories of websites. It often includes a simple interface for adding websites to the block list. The user interface is usually intuitive, making it easy to identify and add specific sites for blocking. This helps manage unwanted notifications from various sources.
- Website Notification Manager: This type of extension typically provides a more comprehensive approach to notification management. It allows for blocking notifications, but also features options for filtering notifications based on the type of content or sender. This allows users to receive only notifications that they deem important, while filtering out irrelevant alerts. The filtering options might include specifying notification sources or the types of events that trigger notifications.
- Customizable Notification Filter: This extension focuses on the ability to customize notification rules and criteria. Users can set specific conditions for notifications to be displayed or blocked. For example, you can specify that notifications should only appear during certain hours of the day or if a particular is present in the notification message. This provides a level of control over the display of notifications that is beyond basic blocking.
Example: Blocking Notifications from a Specific Website
Using a notification control extension, blocking notifications from a specific website is straightforward. After installing the extension, the user typically adds the website’s URL to a designated block list within the extension’s settings. This action prevents the website from sending notifications to the user’s browser. This targeted approach is beneficial for users who want to control notifications from particular websites, preventing unwanted interruptions.
The extension’s user interface usually guides users through the process of adding websites to the block list.
Concluding Remarks
In conclusion, controlling site notifications in Google Chrome is achievable with various methods. From simple permission management to utilizing extensions, you can tailor your browser experience to your preferences. By following the steps Artikeld in this guide, you’ll be well-equipped to handle unwanted notifications and enjoy a more focused and pleasant browsing experience.